
Trying MyGo, a Framework for Building Desktop Apps in Go
MyGo is a framework for building desktop apps in Go. It shows a web UI in the OS WebView and calls native features through a TypeScript client generated from Go methods. This article builds a memo app that saves text to a file on macOS.
MyGo is a framework for building desktop apps in Go. It offers two ways to build the UI shown in a window: a web frontend and native UI. With a web frontend, you build the UI with HTML, CSS, and JavaScript, and implement work such as writing files in Go. MyGo generates a TypeScript client for calling your Go methods, so you won't get "lost" (maigo in Japanese) wiring the frontend to the backend.
In this article, we'll use MyGo's web frontend approach to build a memo app that saves text you type into a file. We'll go from creating a project, through connecting Go and TypeScript and opening the macOS save dialog, to launching the built app.
How MyGo connects the UI and Go
MyGo offers two ways to build the UI shown in a window:
- Web frontend: displays HTML, CSS, and JavaScript in the OS WebView
- Native UI: describes the UI with Go's
uipackage, and MyGo draws it
A WebView is a component for displaying web pages inside an app. This article uses the web frontend approach. With native UI, the UI is also written in Go, so there is no need to bridge to TypeScript. See the native UI documentation for details.
The web frontend approach doesn't bundle a browser engine with the app. Instead, it uses each OS's WebView.
| OS | WebView | Main runtime requirements |
|---|---|---|
| macOS | WKWebView | macOS 12 or later |
| Windows | WebView2 | Windows 10 or 11. Requires the WebView2 Runtime, which Windows 11 includes |
| Linux | WebKitGTK | GTK 3 and WebKitGTK 4.1 or 4.0 |
The architecture document lists keeping overhead low and not requiring cgo among its design goals. cgo is the mechanism that lets Go use C code. On macOS and Linux, MyGo calls native APIs at runtime through
purego and similar tools, so you can build Go programs without a C compiler. On Windows, it calls the Win32 API and WebView2 through syscall and COM.
When the web UI calls Go, it uses IPC (Inter-Process Communication). When you register a Go value with MyGo, it generates TypeScript functions that correspond to the value's exported methods. The functions you call from the UI have typed arguments and return values, but the arguments and return values passed between TypeScript and Go are converted to JSON. As a result, only types that can be converted to JSON can be used for arguments and return values, and using a type that can't be converted makes Bind panic.
In the memo app, we'll split the responsibilities as follows:
- Type a memo into an HTML
textarea - Call the Go save method from TypeScript
- Open the OS save dialog in Go and write to the chosen file
- Return the saved path to TypeScript and show the result in the UI
Creating a project
Following Getting started, set up Go and Bun. Go 1.27 or later is required. Bun is only needed when you use a web frontend.
go version
bun --version
Create a project with the following command. -name is the display name of the window and app, and the last argument is the name of the directory to create.
go run github.com/egoist/mygo/cmd/[email protected] init -name "MyGo Memo" mygo-memo
cd mygo-memo
The default template generates a Go module and a TypeScript frontend that uses Vite. If Bun is installed, the frontend dependencies are installed as well.
The main files you'll edit are as follows:
mygo-memo/
├── main.go          # Window and Go logic
├── go.mod
├── mygo.config.ts   # App name, dev, and build settings
├── index.html
├── src/
│   ├── main.ts      # UI event handling
│   ├── style.css
│   └── mygo.ts      # Client generated from Go
├── package.json
└── vite.config.ts
You can use mygo doctor to check your environment.
bunx --no-install mygo doctorOpening the first window
Let's start by launching the generated app.
bun run devThis command runs mygo dev, which starts the Vite dev server and the Go app.
The code that opens the window is the following part of main.go:
mygo.App.WhenReady(func() {
	mygo.NewWindow(mygo.WindowOptions{
		Title:  "MyGo Memo",
		Width:  640,
		Height: 480,
		URL:    "/",
	})
})
if err := mygo.App.Run(); err != nil {
	log.Fatal(err)
}
App.WhenReady registers a function to run when the app is ready. App.Run starts the event loop, and NewWindow creates a window.
What URL: "/" points to differs between development and the built app. During development, it's resolved against devUrl in mygo.config.ts, which loads http://localhost:5173/ with this configuration. In the built app, it loads the files embedded in the app. The frontend documentation explains this switch.
import { defineConfig } from "mygo-cli";

export default defineConfig({
  name: "MyGo Memo",
  identifier: "com.example.mygomemo",
  version: "0.1.0",
  devUrl: "http://localhost:5173",
  devCommand: "bun run dev:web",
  buildCommand: "bun run build:web",
  frontendDist: "dist",
  bindings: "src/mygo.ts",
  out: "build",
});
devCommand is the command that starts the dev server, and buildCommand is the command that builds the frontend. frontendDist specifies where the built files are output. When you change the Go code, MyGo rebuilds and restarts the app, while Vite applies changes to the UI.
Writing the memo save logic in Go
Next, let's implement the save logic on the Go side. Replace main.go with the following:
package main

import (
	"context"
	"fmt"
	"log"
	"os"

	"github.com/egoist/mygo"
)

type Memo struct{}

// Opens a save dialog and writes the text. Returns an empty string if canceled.
func (Memo) Save(ctx context.Context, text string) (string, error) {
	path, err := mygo.Dialog.Save(mygo.SaveDialogOptions{
		Parent:      mygo.CallerWindow(ctx),
		DefaultPath: "memo.txt",
	})
	if err != nil || path == "" {
		return "", err
	}
	if err := os.WriteFile(path, []byte(text), 0o600); err != nil {
		return "", fmt.Errorf("メモを保存できませんでした: %w", err)
	}
	return path, nil
}

// Starts the app and creates the window, as before
func main() {
	// Register Memo so its exported methods can be called from TypeScript
	mygo.Bind(Memo{})
	mygo.App.WhenReady(func() {
		mygo.NewWindow(mygo.WindowOptions{
			Title:  "MyGo Memo",
			Width:  640,
			Height: 480,
			URL:    "/",
		})
	})
	if err := mygo.App.Run(); err != nil {
		log.Fatal(err)
	}
}
Memo is an empty struct that groups the save functionality. func (Memo) Save(...) defines a method on the Memo type. In Go, Save is an exported method because its name starts with an uppercase letter.
Registering a value with mygo.Bind(Memo{}) makes its exported methods callable from the frontend. Register it before calling App.Run.
The save dialog and cancellation
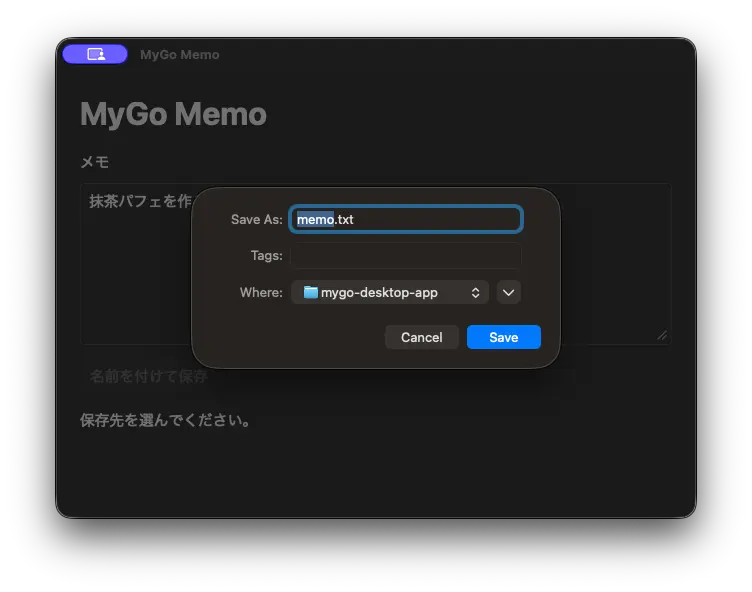
mygo.Dialog.Save opens the OS save dialog and returns the selected path. DefaultPath is the file name shown initially. Passing mygo.CallerWindow(ctx) to Parent attaches the dialog to the calling window. On macOS, it appeared as a sheet attached to the window.
The leading context.Context is an argument that MyGo passes in. Here, it's used to get the calling window. You don't need to pass this argument from TypeScript.
path, err := mygo.Dialog.Save(mygo.SaveDialogOptions{
	Parent:      mygo.CallerWindow(ctx),
	DefaultPath: "memo.txt",
})
If the user cancels the save dialog, an empty string is returned. To avoid writing to an empty path, the method returns immediately when path == "". Writing to the selected path is done with os.WriteFile.
if err != nil || path == "" {
	return "", err
}
if err := os.WriteFile(path, []byte(text), 0o600); err != nil {
	return "", fmt.Errorf("メモを保存できませんでした: %w", err)
}
0o600 is the permission for newly created files; on macOS, it lets only the owner read and write the file. If you choose an existing file, os.WriteFile overwrites its contents.
Checking the TypeScript client
mygo dev regenerates src/mygo.ts whenever the Go code changes. If the dev app isn't running, you can generate it with the following command:
bun run generateFor our Save method, the following code was generated (comments omitted):
import { call } from "mygo-runtime";

export const Memo = {
  save(text: string): Promise<string> {
    return call("Memo.Save", text);
  },
} as const;
Go's Save(ctx, text) becomes save(text) in TypeScript. The method name starts with a lowercase letter, and the return value becomes Promise<string>, representing an asynchronous operation. If the Go side returns an error, the Promise is rejected, so you can handle it with try / catch on the calling side.
The rejected error is a CallError from mygo-runtime. CallError is a class that extends Error; its message holds the Go error string, and its method holds the name of the method that failed ("Memo.Save" in this case). You can check whether an error came from Go with isCallError.
import { isCallError } from "mygo-runtime";

try {
  await Memo.save(text);
} catch (error) {
  if (isCallError(error)) {
    // e.g. "メモを保存できませんでした: open /path/to/memo.txt: permission denied"
    console.error(error.method, error.message);
  } else {
    throw error;
  }
}
Building the memo input UI
In the HTML, we'll add an input field, a save button, and an area to show the result. Replace index.html with the following:
<!doctype html>
<html lang="ja">
  <head>
    <meta charset="UTF-8" />
    <meta name="viewport" content="width=device-width, initial-scale=1.0" />
    <title>MyGo Memo</title>
    <link rel="stylesheet" href="./src/style.css" />
  </head>
  <body>
    <main>
      <h1>MyGo Memo</h1>
      <form id="memo-form">
        <label for="memo">メモ</label>
        <textarea id="memo" rows="8"></textarea>
        <button id="save" type="submit">名前を付けて保存</button>
      </form>
      <p id="status" role="status"></p>
    </main>
    <script type="module" src="./src/main.ts"></script>
  </body>
</html>
Next, handle the form submission in src/main.ts.
import { Memo } from "./mygo";

const form = document.querySelector<HTMLFormElement>("#memo-form")!;
const memo = document.querySelector<HTMLTextAreaElement>("#memo")!;
const save = document.querySelector<HTMLButtonElement>("#save")!;
const status = document.querySelector<HTMLParagraphElement>("#status")!;

form.addEventListener("submit", async (event) => {
  event.preventDefault();
  save.disabled = true;
  status.textContent = "保存先を選んでください。";

  try {
    const path = await Memo.save(memo.value);
    status.textContent = path ? `保存しました: ${path}` : "保存をキャンセルしました。";
  } catch (error) {
    status.textContent = error instanceof Error ? error.message : String(error);
  } finally {
    save.disabled = false;
  }
});
When the form is submitted, it calls the Go save logic with Memo.save(memo.value). It uses await to wait for the save to complete, then shows the result in the UI depending on whether it succeeded, was canceled, or failed.
Finally, replace src/style.css to stack the input field and button vertically.
:root {
  font-family: system-ui, sans-serif;
  color-scheme: light dark;
}
body { margin: 24px; }
main { max-width: 640px; margin-inline: auto; }
form { display: grid; gap: 12px; }
textarea, button { font: inherit; padding: 8px; }
textarea { resize: vertical; }
button { justify-self: start; }
#status { overflow-wrap: anywhere; }
After typing a memo in the app, the screen looks like this:
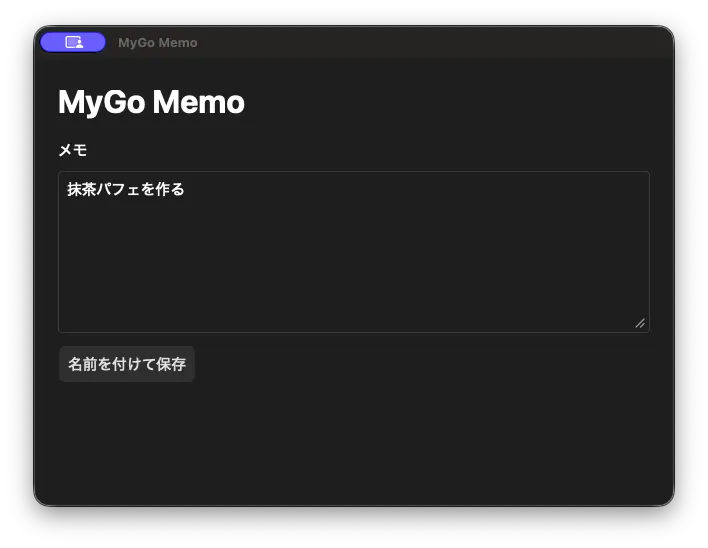
Clicking the save button goes through the Go logic and opens the macOS save dialog. As shown below, you can choose the file name and location.
I confirmed that memo.txt was created at the specified path and that the memo, including Japanese text, was saved.
Building the app
Once you've confirmed it works, let's build the app.
bun run buildmygo build generates the TypeScript client and runs buildCommand. With this template, that runs the TypeScript type check and the Vite build. It then embeds the frontend files into the Go executable and packages everything as a macOS app.
In my environment, the following files were generated:
build/darwin-arm64/
├── MyGo Memo.app
└── MyGo Memo 0.1.0.dmg
Quit the dev app, then launch the generated .app. On macOS, you can also open it with the following command:
open "build/darwin-arm64/MyGo Memo.app"The built app loads the embedded UI from mygo://localhost/.
On macOS, builds use ad-hoc signing unless you specify a Developer ID. What I verified here was launching the app on my own Mac. To distribute it to other users, you'll also need to sign it with a Developer ID and notarize it. See Building and distributing for details.
Summary
- MyGo is a framework for building desktop apps in Go, offering two approaches: a web frontend and native UI
- A TypeScript client is generated from the exported methods of Go values registered with
mygo.Bind, and the frontend can call them as typed asynchronous functions - We chose a destination with
mygo.Dialog.Saveand saved a memo containing Japanese text with Go'sos.WriteFile mygo buildproduces an app with the frontend embedded