Trying Claude Managed Agents for Building Agents at Scale
Claude Managed Agents provides the harness and infrastructure to run Claude as an autonomous agent. It is designed for long-running and asynchronous tasks. This article walks through trying it out in practice.
Claude Managed Agents, a service for building and deploying cloud-hosted agents at scale, has been released in public beta. Claude Managed Agents provides the harness and infrastructure needed to run Claude as an autonomous agent. It is intended for long-running and asynchronous tasks.
If you try to build an environment for autonomous agents yourself, you need to invest engineering effort in a secure sandbox, storage for agent state, monitoring tools, access controls, and more. By using Managed Agents, you no longer have to build that infrastructure yourself, and can focus on the core work of delivering value to users. Managed Agents is built specifically for Claude and optimized to get the most out of its capabilities.
This article walks through my experience trying Claude Managed Agents in practice. By the end, you should have a solid grasp of the core concepts, know how to start a session in Claude Console, and understand the flow for asking an agent connected to a GitHub repository to perform a practical task.
Claude Managed Agents is a usage-based service. In addition to normal Claude API token usage, it charges $0.08 per session-hour for the time a session is in the running state. Time spent in idle or terminated is not billed. See the documentation for pricing details.
Getting Started with Claude Managed Agents
To get a feel for how Claude Managed Agents works, let's go through the basic flow in Claude Console from creating an agent to starting a session.
Claude Managed Agents can be used either from Claude Console or through the API with an SDK. At a high level, you create an agent through the /v1/agents endpoint and start a session through the /v1/sessions endpoint. In Claude Console, you can go through that entire flow interactively in the UI.
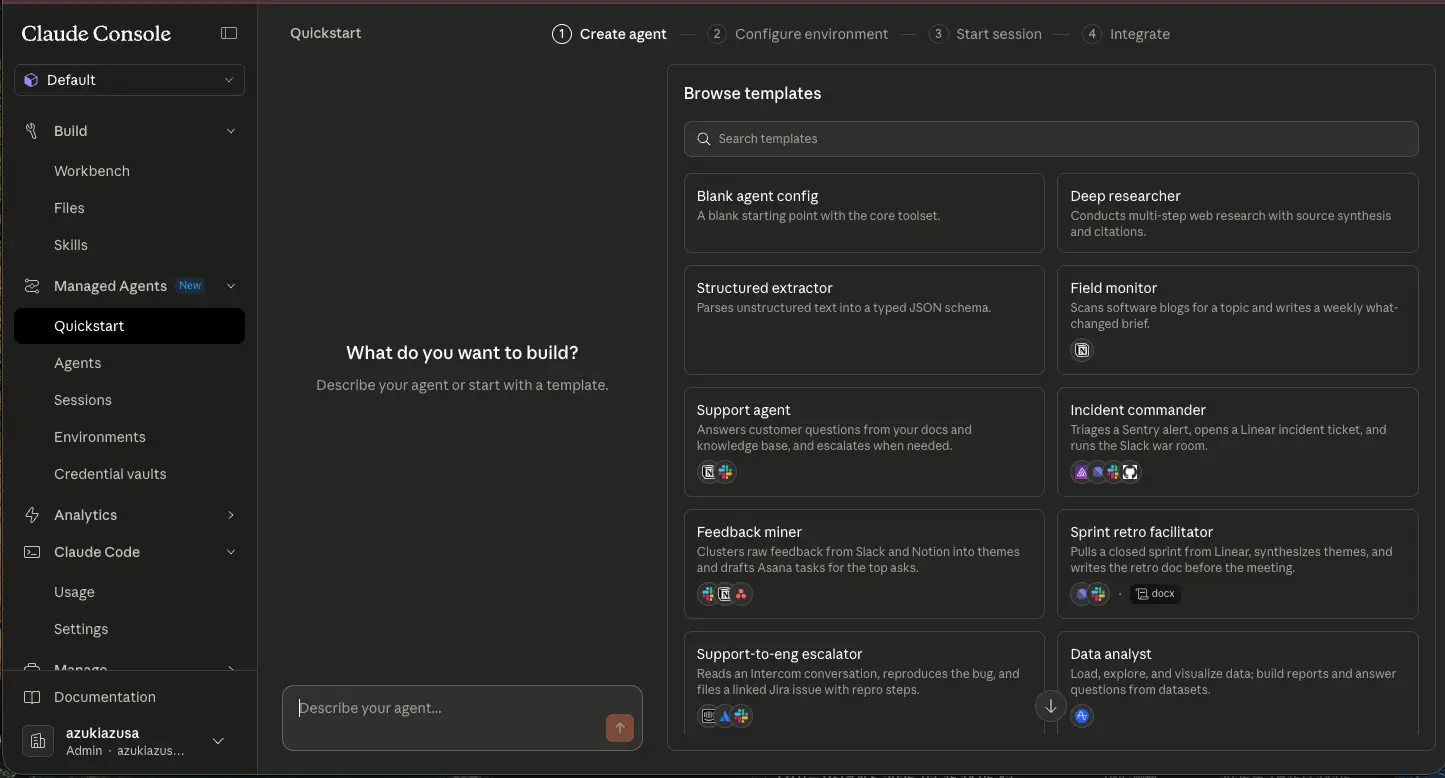
Here I will show how to use it from Claude Console. If you open the Claude Managed Agents quickstart guide, you will see a step-by-step guide for getting started.
Managed Agents is built around the following four concepts:
- Agent: Create an agent by configuring the model, system prompt, tools, MCP servers, and skills
- Environment: Create the environment where the agent will execute tasks, including preinstalled packages in a cloud container such as Python, Node.js, and Go, as well as network access settings
- Session: An instance that combines an agent and an environment to execute tasks and retain conversation history
- Events: The units that represent interactions within a session, such as user instructions and agent responses
The quickstart guide begins with a screen for selecting an agent. You can either choose from prebuilt templates or create one entirely from scratch. The templates cover a variety of use cases, such as task management agents and coding agents. For example, if you select the Incident Commander template, you will see a YAML configuration like the following:
name: Incident commander
description: Triages a Sentry alert, opens a Linear incident ticket, and runs the Slack war room.
model: claude-opus-4-6
system: |-
  You are an on-call incident commander. When handed a Sentry issue ID or an error fingerprint:

  1. Pull the full event payload, stack trace, release tag, and affected-user count from Sentry.
  2. Grep the repo for the top frame's file path and surrounding commits (last 72h).
  3. Open a Linear incident ticket with severity, suspected blast radius, and your rollback recommendation.
  4. Post a threaded status to the incident Slack channel: what broke, who's looking, ETA for next update.
  5. Every 15 minutes, re-check Sentry event volume and update the thread until the user closes the incident.

  Be decisive. If you're >70% confident it's a specific deploy, say so and recommend the revert.
mcp_servers:
  - name: sentry
    type: url
    url: https://mcp.sentry.dev/mcp
  - name: linear
    type: url
    url: https://mcp.linear.app/mcp
  - name: slack
    type: url
    url: https://mcp.slack.com/mcp
  - name: github
    type: url
    url: https://api.githubcopilot.com/mcp/
tools:
  - type: agent_toolset_20260401
  - type: mcp_toolset
    mcp_server_name: sentry
    default_config:
      permission_policy:
        type: always_allow
  - type: mcp_toolset
    mcp_server_name: linear
    default_config:
      permission_policy:
        type: always_allow
  - type: mcp_toolset
    mcp_server_name: slack
    default_config:
      permission_policy:
        type: always_allow
  - type: mcp_toolset
    mcp_server_name: github
    default_config:
      permission_policy:
        type: always_allow
metadata:
  template: incident-commander
This configuration defines an agent that triages Sentry alerts, opens incident tickets in Linear, and runs a war room in Slack. The agent uses the claude-opus-4-6 model, and the system prompt describes the agent's role and the steps it should follow. You can also see that the tools available to the agent are defined through mcp_servers and tools.
Here, let's choose the Blank agent template and create a general-purpose agent. A YAML or JSON configuration screen will appear. Review the contents and click "Use this template" to create the agent.
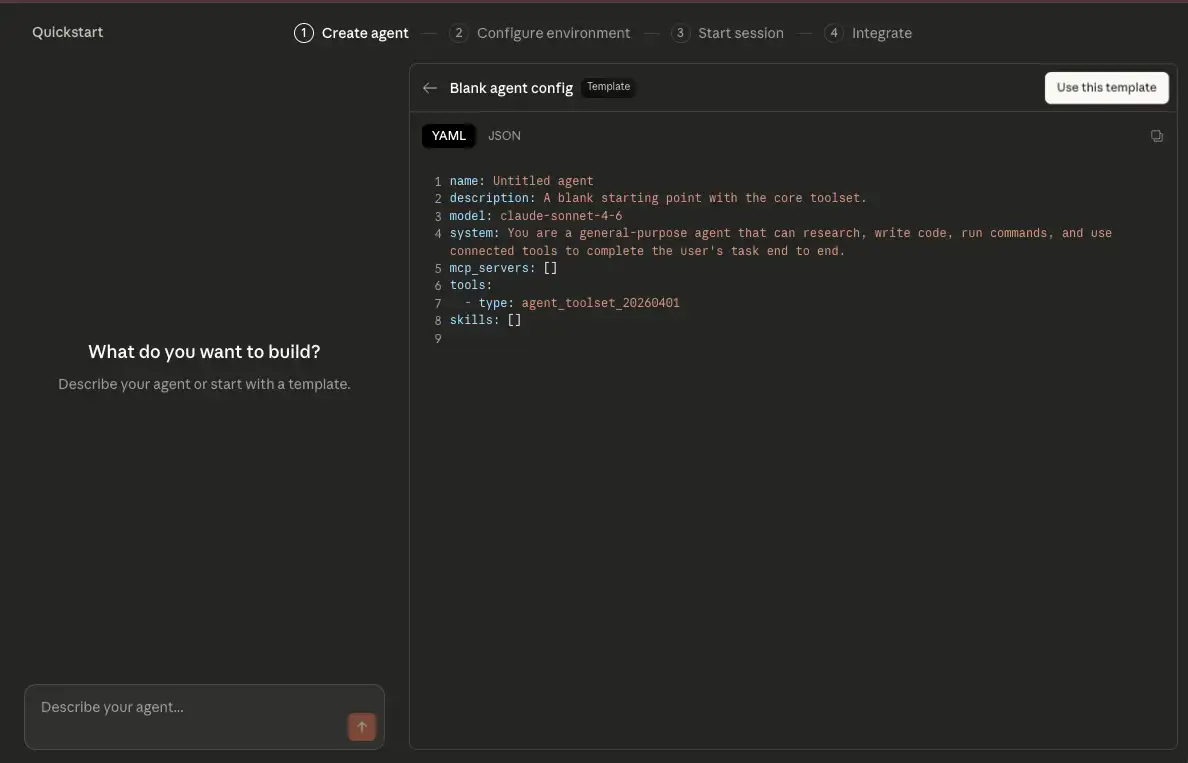
The agent is created by sending a POST request to the /v1/agents endpoint. The console shows the execution log. Once the agent has been created, click "Next: Configure environment" to move on to configuring the environment.

The environment configuration proceeds interactively through a conversation with the agent. In my case, it asked whether the environment should be able to access the open internet or only specific hosts.
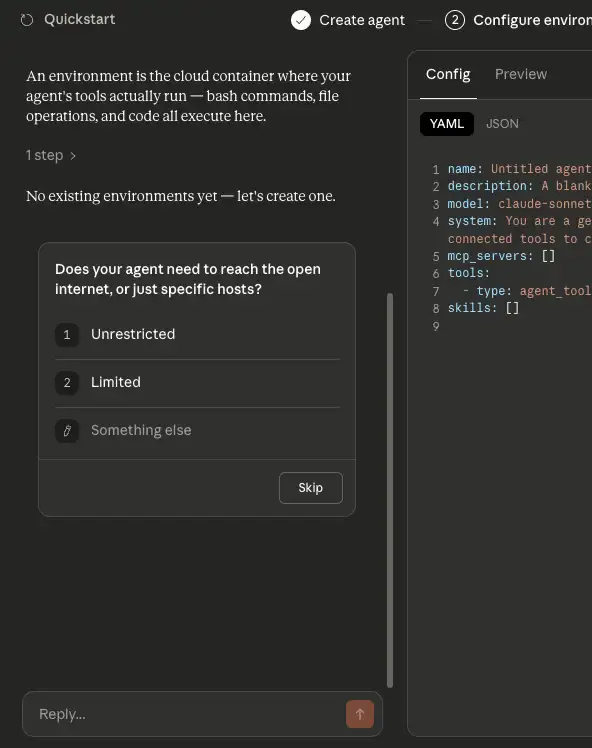
Two network modes are available: unrestricted and limited. In unrestricted mode, the environment is allowed all network access except for a small blocklist. In limited mode, network access is blocked by default, and only the hosts listed in allowed_hosts are permitted. There are also allow_mcp_servers and allow_package_managers options. When set to true, they allow access to MCP servers and public package managers such as PyPI and npm.
If you answer the agent in a way that allows network access, a POST request is sent to the /v1/environments endpoint to create the environment. Once the environment is ready, click "Next: Start session" to begin a session.
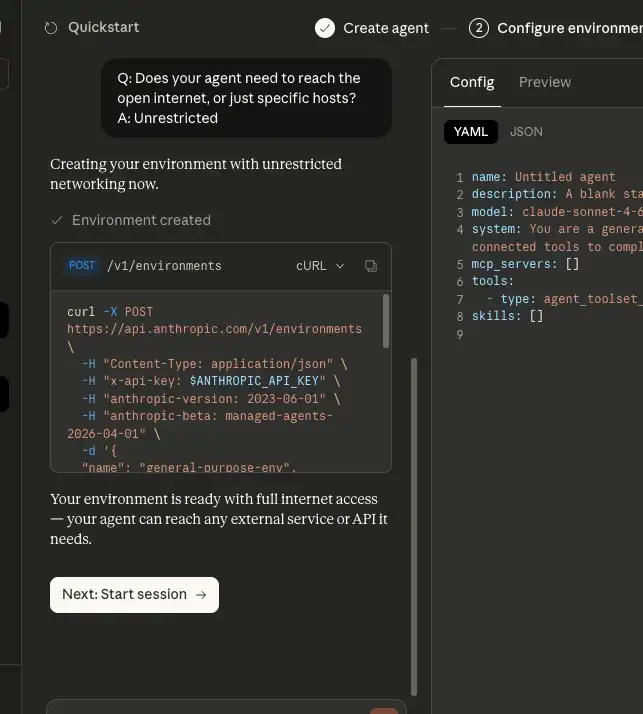
A session starts when a POST request is sent to the /v1/sessions endpoint. A session is an instance of an agent running inside an environment. It references both the agent and the environment and keeps the conversation history. At the moment a session is created, no task is running yet. The agent starts working only after the user sends a message.
Once the session starts, a message input box appears on the right side of the screen. Try sending a message to instruct the agent. The placeholder text says "Search the web for the latest news about Claude AI and summarize the top 3 stories.", so I simply sent that as-is.
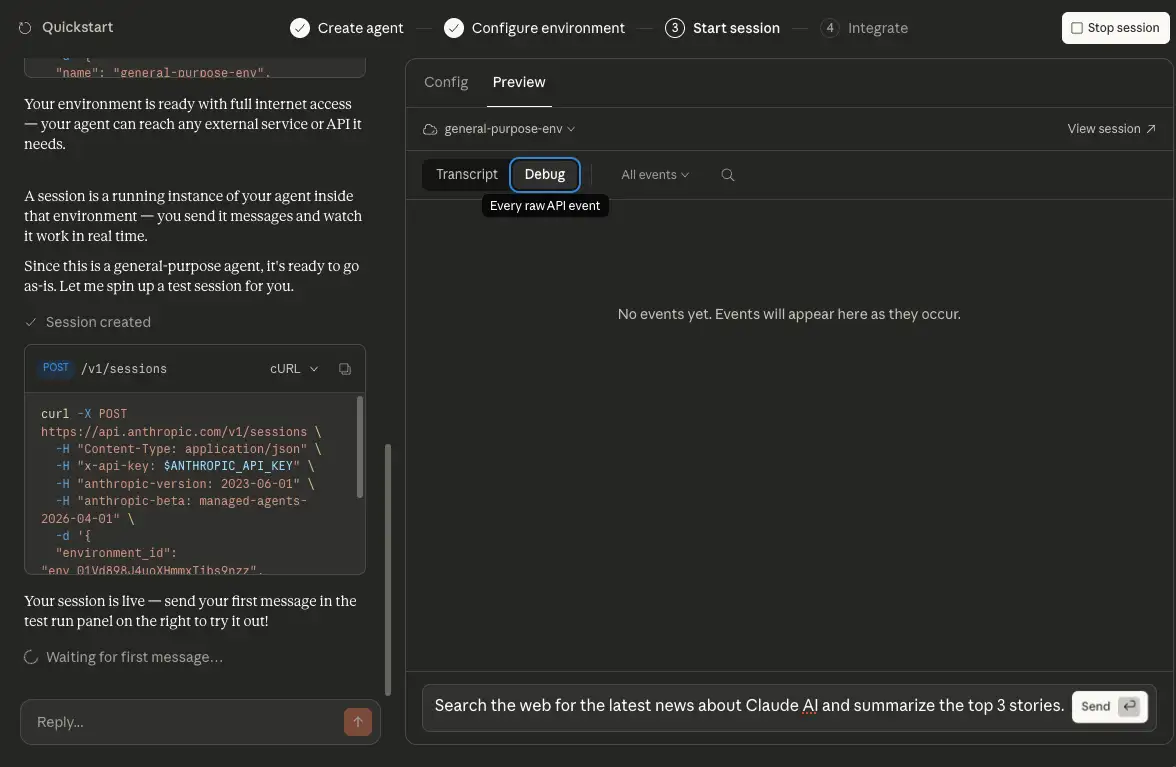
The message itself is sent with a POST request to /v1/sessions/:session_id/events. The event stream, however, is received from /v1/sessions/:session_id/stream. In Claude Console these look like one continuous interaction, but at the API level sending and receiving use different endpoints. The stream shows things like Web Search tool calls and the agent's responses as they happen.
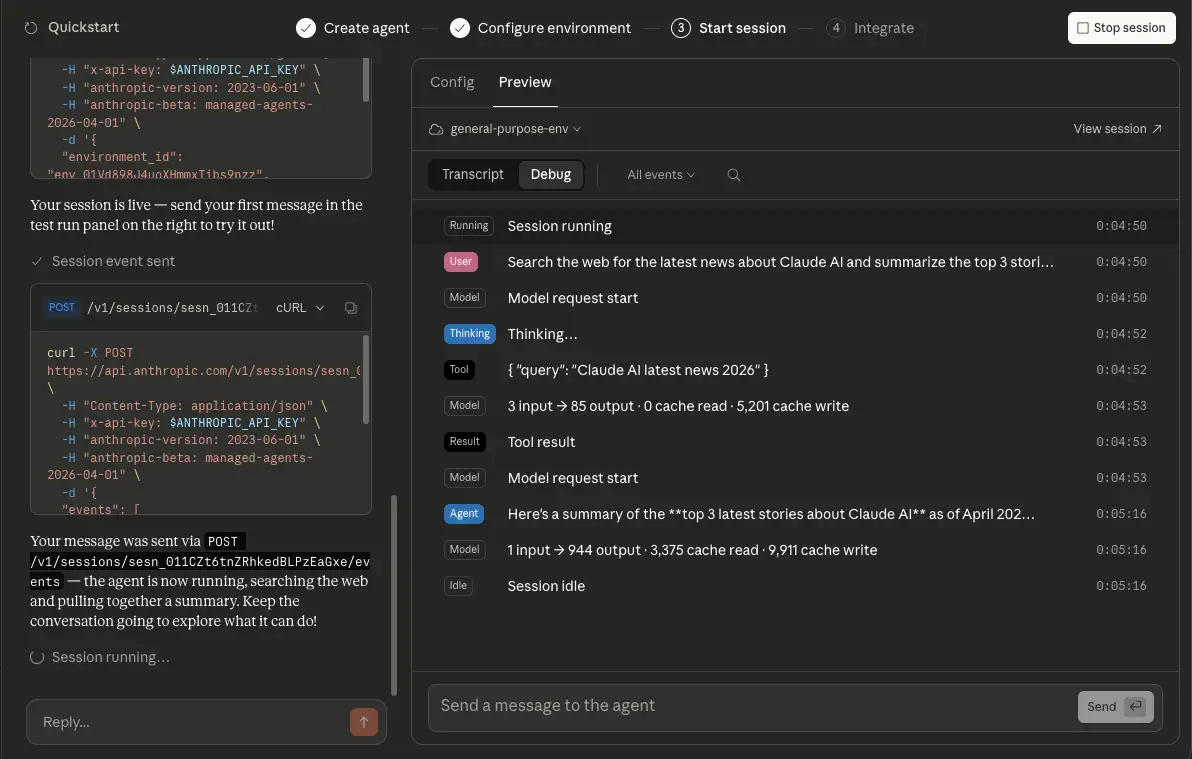
After you send the first message, the full flow until the agent finishes the task and returns a response is recorded as a sequence of events. These events are grouped into user events, which the user sends to start or control a session; agent events, session events, and span events, which are used to observe session state and agent progress.
Event types use the {domain}.{action} naming convention, and examples include the following:
user.message: An event triggered when the user sends a message to the sessionagent.message: A response from the agentagent.tool_use: An event triggered when the agent uses a toolsession.status_idle: An event triggered when the agent finishes the current task and becomes idlespan.model_request_start: An event triggered when a request to the model begins
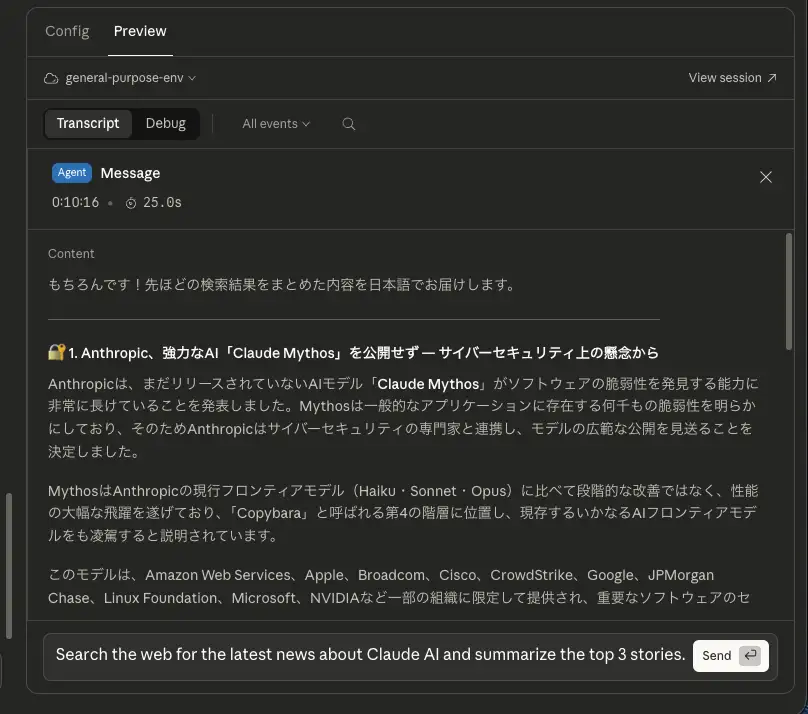
If you inspect the response from the agent, you can see that it really did return a summary of the news stories. That completes the quickstart guide.
Connecting a GitHub Repository and Having It Create a Pull Request
Now that we have covered the basic flow, let's try a more practical example: combining the GitHub MCP server with a GitHub repository resource so the agent can make code changes and create a pull request.
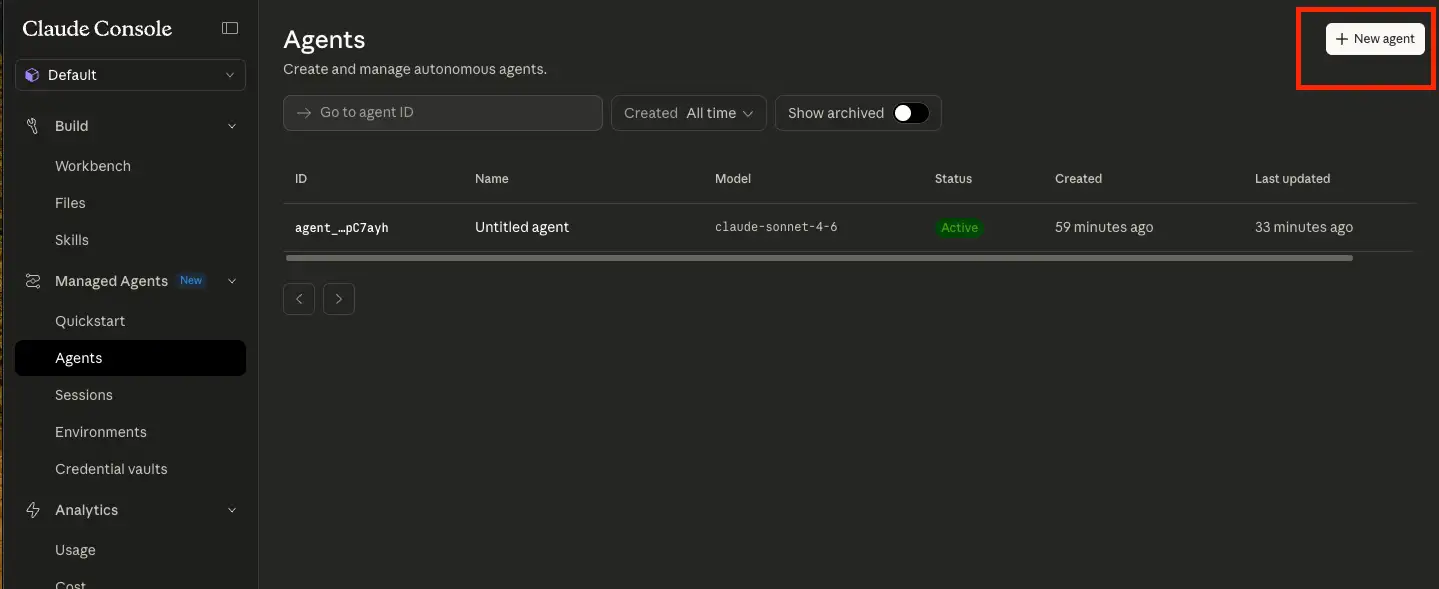
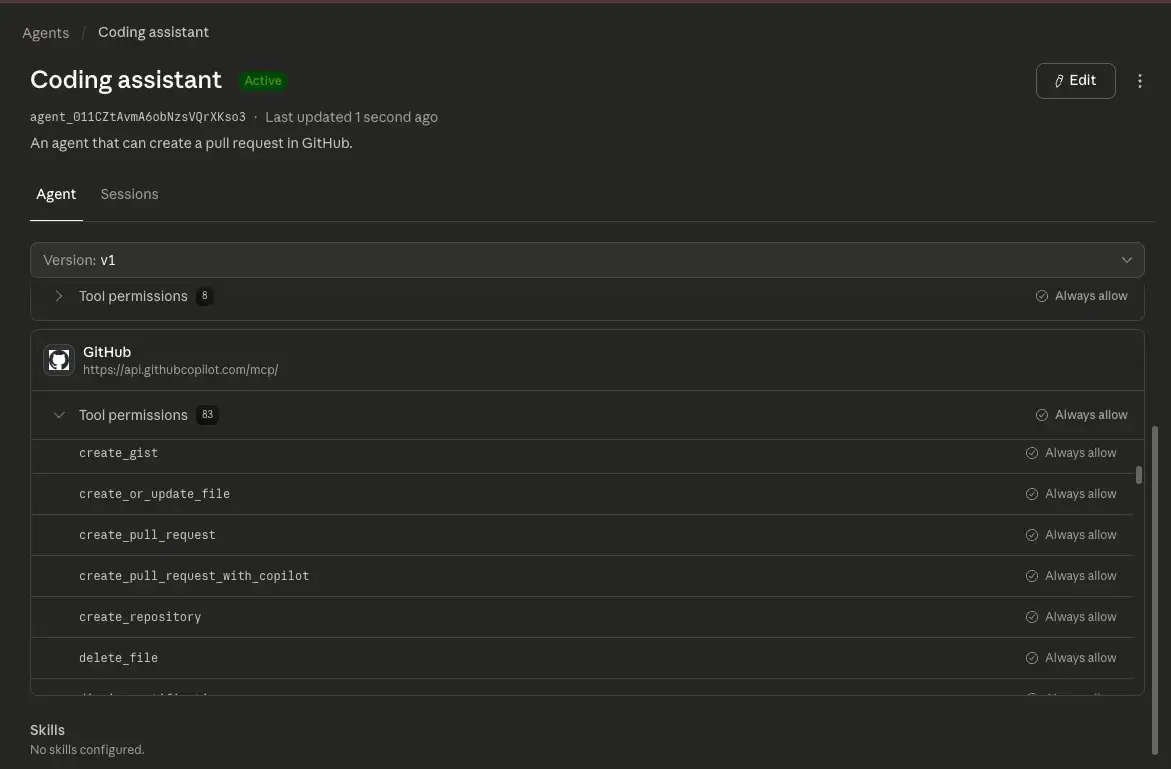
Now that we understand the basic concepts of Managed Agents, let's have it perform a practical task by connecting it to a GitHub repository and asking it to create a pull request. First, create an agent that can access the GitHub MCP server. Open the list of agents from "Agents" in the left sidebar, then click "New agent" to begin creating a new one.
Enter the agent configuration in YAML format in the modal dialog. For example:
name: Coding assistant
description: An agent that can create a pull request in GitHub.
model: claude-sonnet-4-6
system: |-
  You are a coding assistant. You can use the GitHub MCP server to interact with GitHub repositories.
# MCP server definition. Specify the URL of the GitHub MCP server.
mcp_servers:
  - name: github
    type: url
    url: https://api.githubcopilot.com/mcp/
tools:
  # Basic toolset including bash, read, write, and web_search
  - type: agent_toolset_20260401
  # If mcp_servers is defined, specify type: mcp_toolset so the MCP server can be used as a tool
  - type: mcp_toolset
    mcp_server_name: github
    default_config:
      permission_policy:
        type: always_allow
Once the agent is created, you can verify that the GitHub MCP server is defined as a tool and that operations such as create_pull_request are available.
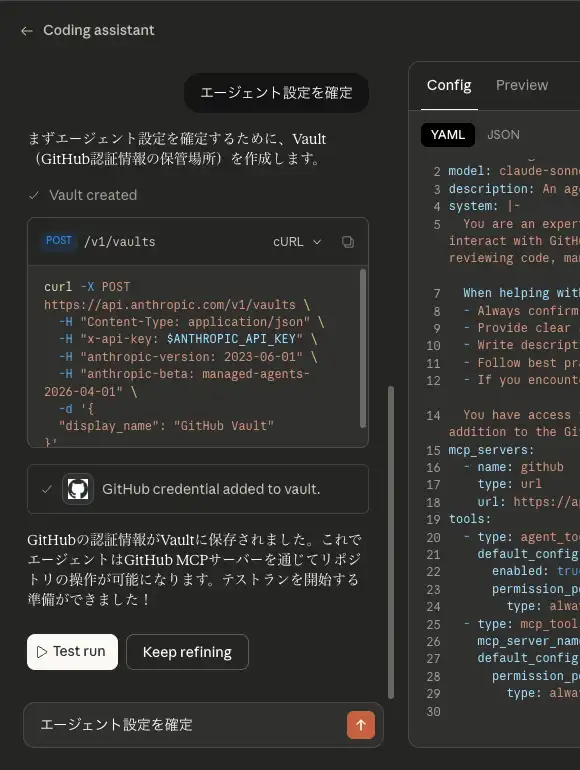
However, the agent still cannot access the GitHub MCP server because it has not been authenticated yet. In my case, the product guided me through an OAuth-based flow, and the resulting credentials were stored in Vault. Those credentials are bound to mcp_server_url and are used when the agent accesses the MCP server. To store credentials in Vault, open "Credential vault" from the left sidebar and click "New value".
When I tried it, I clicked "Guided Edit" in the agent configuration and resolved the authentication issue through an interactive conversation with the agent. When I asked, "How do I complete authentication for the github mcp server?", it replied that authentication for the GitHub MCP server is handled through Vault, and then walked me through the flow to store the credentials there.
Next, create a session. When starting a session, you can optionally specify resources. Available resources include things like "GitHub repository" and "File", which define what the agent can access when the session starts. The GitHub repository resource configured here is separate from the GitHub MCP server credentials stored in Vault and receives its own authentication information for cloning the repository. Select the "Coding assistant" agent you created earlier, and choose "GitHub repository" as the resource.
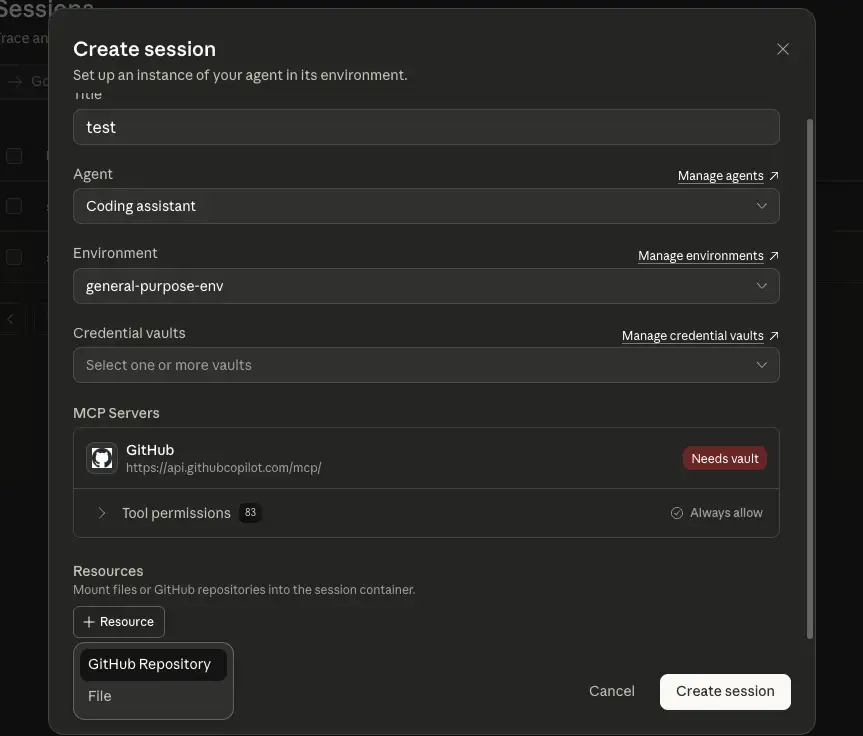
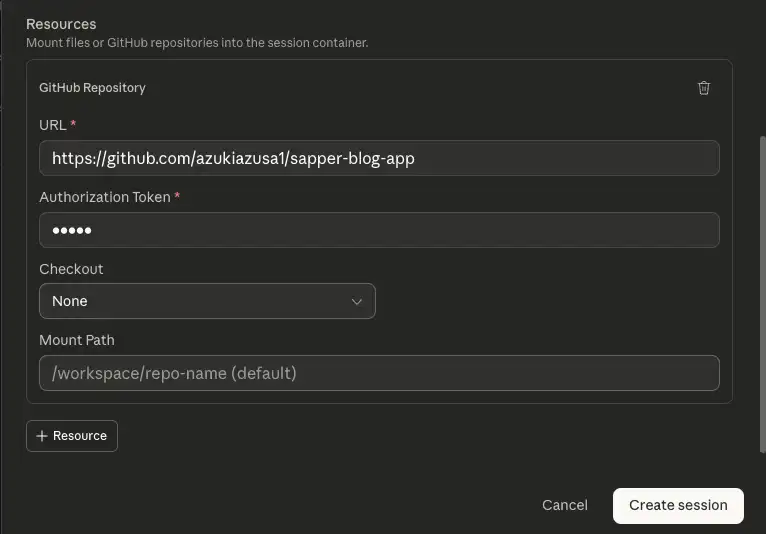
You will then see a form for the resource options, where you enter the GitHub repository URL and an Authentication Token. You can create the Authentication Token in GitHub under Developer Settings → Fine-grained tokens. When creating the token, you need to grant the following permissions:
- Contents: Read and write
- Pull requests: Read and write
- Repository metadata: Read
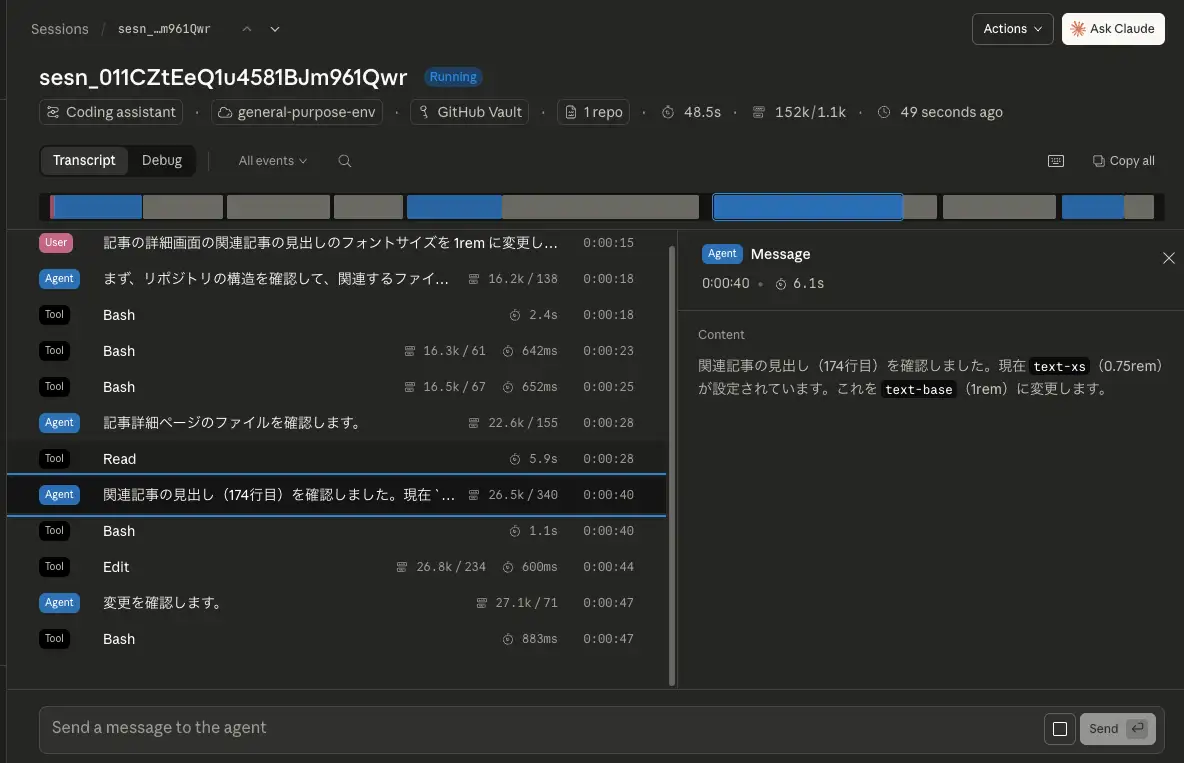
Once the session is ready, try giving the agent an instruction. Here I asked it: "Change the font size of the related articles heading on the article detail page to 1rem, and create a pull request with that change."
You can see the agent analyzing the codebase, identifying the file to modify, and then using the Edit tool to make the change. When the task is complete, the agent transitions to the Idle state. In this case, I was able to confirm that it went as far as producing a proposed change to the target file and carrying the process through to the operations needed for pull request creation.
Summary
- Claude Managed Agents is a service for building and deploying cloud-hosted agents at scale
- By using Managed Agents, you no longer need to build the infrastructure required to run agents, such as sandboxing, storage for agent state, monitoring tools, and access controls, which lets you focus on the core work of delivering value to users
- Managed Agents is built around four core concepts: agent, environment, session, and events
- You can go through the entire flow from agent creation to session start interactively in the UI
- By storing credentials in Vault ahead of time, the agent can use them to access external services such as the GitHub MCP server
- You can specify resources when starting a session, giving the agent access to resources such as files and GitHub repositories
- Good fits include long-running work, asynchronous tasks, and jobs that span multiple external tools
- On the other hand, for lightweight tasks that need fine-grained control or cases where a single model call is enough, using the Messages API directly may be simpler