
When you add an AI agent to a web application, it's common to manage the frontend app and the agent backend as separate projects. In that case, you have to start two servers separately during local development, and set up everything yourself, from CORS settings to connecting the app's login session with the agent's authentication.
eve 1.0, the AI agent framework that Vercel made generally available (GA) in November 2026, expands its framework integrations to solve this problem. They support five frameworks: Next.js, Nuxt, SvelteKit, TanStack Start, and Vite. You can now develop, build, and deploy a web app and an eve agent as a single project on the same origin.
In this article, we'll run a minimal setup with Next.js and a React hook to see how it works.
Why framework integrations were added
eve is a framework for building AI agents with a filesystem-based approach. When you develop the agent on its own, using it from a web frontend involves extra work like the following:
- During local development, you have to start the web app's development server and
eve devas separate processes and keep their URLs and ports in sync - The frontend and the agent end up on different origins, so you need CORS settings and environment variables for the base URL
- You can't pass the existing app's cookie-based authentication session straight through to the agent's routes
- At deployment time, you also have to wire up routing between the web app and the agent by hand
eve 1.0 framework integrations take over this configuration and routing work through framework plugins and config wrappers. The runtime itself stays separate, while the development proxy and the deployment service configuration are automated to bring everything onto one origin.
As the official Next.js guide states, the agent is not embedded in the framework's server and runs as an independent service. The official docs don't explain why the agent is kept separate, but since eve has its own build process and Workflow runtime, the likely goal is to avoid conflicts with the host app's withWorkflow or middleware. Keeping it as an independent service also lets frameworks other than Next.js and other channels such as Slack share the same runtime.
Supported frameworks and how they work
eve 1.0 framework integrations support the following five web frameworks:
If you want to add a complete chat UI to a new eve project, you can also use the CLI installer.
eve add channel/webWhen you run this command, it interactively asks you to choose a framework (Next.js or TanStack Start), a hosting setup, and an authentication method (Sign in with Vercel is available only for Next.js). It then generates a complete chat app built on AI Elements in apps/web/.
On the client side, eve provides a useEveAgent hook that works with the same model across React, Vue, and Svelte.
Integrating eve with Next.js
There are two ways to integrate eve with Next.js:
- Vercel services setup: place a
vercel.tsat the project root, and run the app and the agent side by side as separate services withvercel dev --local - Next.js hosting setup: wrap
next.config.tswithwithEve()fromeve/next, and start both the app and the agent with justnext devornext start
Here we'll use the Next.js hosting setup, which is easy to add to an existing Next.js app, and get a chat UI running with a minimal setup. The final directory structure looks like this:
.
├── agent/
│   ├── agent.ts              # Agent model settings
│   ├── instructions.md       # System prompt
│   └── channels/
│       └── eve.ts            # HTTP channel auth settings
├── app/
│   ├── _components/
│   │   └── chat.tsx          # Chat UI using useEveAgent
│   ├── layout.tsx
│   └── page.tsx
├── next.config.ts            # Integrates Next.js and eve with withEve()
└── package.json
Installing dependencies
eve/next requires Node.js 24 or later, Next.js 16, and React 19. Prepare a package.json and install the required packages.
{
  "name": "eve-framework-integration-example",
  "private": true,
  "type": "module",
  "scripts": {
    "dev": "next dev",
    "build": "next build",
    "start": "next start",
    "typecheck": "tsc --noEmit"
  },
  "dependencies": {
    "eve": "^1.0.0",
    "next": "^16.0.0",
    "react": "^19.0.0",
    "react-dom": "^19.0.0"
  },
  "devDependencies": {
    "@types/node": "^24.0.0",
    "@types/react": "^19.0.0",
    "@types/react-dom": "^19.0.0",
    "typescript": "^5.9.0"
  }
}
npm installApplying withEve() in next.config.ts
Wrap the Next.js config object with withEve() from eve/next. By default, withEve() automatically detects the agent/ directory (or an agents/ workspace) in the same directory as next.config.ts. If your agent lives in a different directory, you can point to it with the eveRoot option, as in withEve(nextConfig, { eveRoot: "../.." }).
import type { NextConfig } from "next";
import { withEve } from "eve/next";

const nextConfig: NextConfig = {};

export default withEve(nextConfig);
Internally, withEve() returns a Next.js config function, (phase, context) => config. In the development phase (next dev), it starts the agent server and sets up rewrites for /eve/v1/*. For the production build (next build) and production start (next start), it switches to the routing and server management suited to each environment.
Defining the agent
Create an agent/ directory directly under the project root, and put the model settings, the system prompt, and the HTTP channel's auth policy in it.
First, create agent/agent.ts. Here, the agent uses an OpenAI model if the OPENAI_API_KEY environment variable is set, and otherwise falls back to mockModel() from eve/evals.
import { defineAgent } from "eve";
import { mockModel } from "eve/evals";
import { openai } from "eve/models/openai";

const fallbackModel = mockModel(({ lastUserMessage }) => ({
  text: `「${lastUserMessage ?? ""}」を受け取りました。Next.js と同一オリジン(/eve/v1/*)経由で応答しています。`,
}));

export default defineAgent({
  model: process.env.OPENAI_API_KEY ? openai() : fallbackModel,
});
Next, write the agent's instructions in agent/instructions.md.
# Instructions

You are a concise assistant that replies in Japanese.
Then define the HTTP channel settings in agent/channels/eve.ts. In eve, entry points that let the outside world reach the agent, such as Slack, Discord, and HTTP, are managed as "channels." Among them, the HTTP channel is the entry point that provides the API browser clients like useEveAgent() use to communicate over /eve/v1/*, and that checks the authentication of each request.
import { localDev, placeholderAuth, vercelOidc } from "eve/channels/auth";
import { eveChannel } from "eve/channels/eve";

export default eveChannel({
  auth: [vercelOidc(), localDev(), placeholderAuth()],
});
The auth array is evaluated from the start. localDev() accepts only loopback requests on a local development server (eve dev or vercel dev) and is ignored in production. The final placeholderAuth() always rejects requests as unauthenticated, so the agent fails closed: even if you deploy without configuring production auth, it can't be called unintentionally from outside.
In fact, even without agent/channels/eve.ts, eve uses the same [vercelOidc(), localDev(), placeholderAuth()] as its default auth policy. The reason to create the file anyway is to make explicit in code which requests the agent accepts. Also, before deploying to production, you need to replace placeholderAuth() with an auth function (AuthFn) that verifies the app's login session. Having the file in place from the start makes it clear where that replacement goes.
Building a minimal chat UI with useEveAgent
On the frontend, call useEveAgent() from eve/react in a Client Component. Because withEve() mounts /eve/v1/* on the same origin, you don't need to specify a baseUrl.
"use client";

import { useState } from "react";
import { useEveAgent } from "eve/react";

export function Chat() {
  const agent = useEveAgent();
  const [draft, setDraft] = useState("");
  const isResuming = agent.status === "resuming";

  return (
    <section>
      <div>
        {agent.messages.map((message) => (
          <article key={message.id}>
            <header>{message.role}</header>
            {message.parts.map((part, index) =>
              part.type === "text" ? (
                <p key={part.id ?? index}>{part.text}</p>
              ) : null,
            )}
          </article>
        ))}
      </div>

      {agent.error ? <p>{agent.error.message}</p> : null}

      <form
        onSubmit={(event) => {
          event.preventDefault();
          const text = draft.trim();
          if (text.length === 0 || isResuming) return;
          setDraft("");
          void agent.send(text);
        }}
      >
        <input
          aria-label="メッセージ"
          disabled={isResuming}
          onChange={(event) => setDraft(event.currentTarget.value)}
          placeholder="メッセージを入力..."
          value={draft}
        />
        <button disabled={isResuming} type="submit">
          送信
        </button>
      </form>
    </section>
  );
}
This component uses messages, status, error, and send returned from useEveAgent().
agent.send(text)sends a message to the server.send()resolves as soon as the server accepts the message, and the reply is reflected inagent.messagesprogressively through an NDJSON (newline-delimited JSON) stream. Optimistic updates are enabled by default, so the user's message appears right after sendingagent.statustakes one of three states:"idle","busy", or"resuming". Disabling input while a saved session is being restored ("resuming") is recommended. On the other hand, sending isn't blocked while the agent is working ("busy") because, by default, a message sent during processing steers the work in progress with additional instructions. To have it handled as the next request after the current one finishes, pass{ turnPolicy: "queue" }agent.errorholds the most recent error
Finally, create app/layout.tsx and app/page.tsx to render <Chat />.
import type { ReactNode } from "react";

export default function RootLayout({
  children,
}: {
  readonly children: ReactNode;
}) {
  return (
    <html lang="ja">
      <body>{children}</body>
    </html>
  );
}import { Chat } from "./_components/chat";
export default function HomePage() {
return (
<main>
<Chat />
</main>
);
}Trying it out
First, run npm run dev. Here, we set the development server's port to 3123.
npm run dev -- --port 3123The startup log shows the Next.js development server, followed by the eve development server that starts automatically.
▲ Next.js 16.4.6 (Turbopack)
- Local:         http://localhost:3123
✓ Ready in 276ms
✓ Running next.config.ts took 1045ms
[eve:dev] server listening at http://127.0.0.1:52670/
When you send a request to the health check endpoint on the Next.js origin, the agent responds through the proxy.
curl -s http://localhost:3123/eve/v1/health{"ok":true,"status":"ready","workflowId":"workflow//eve//workflowEntry"}Next, I opened http://localhost:3123 in a browser and sent messages from the chat.
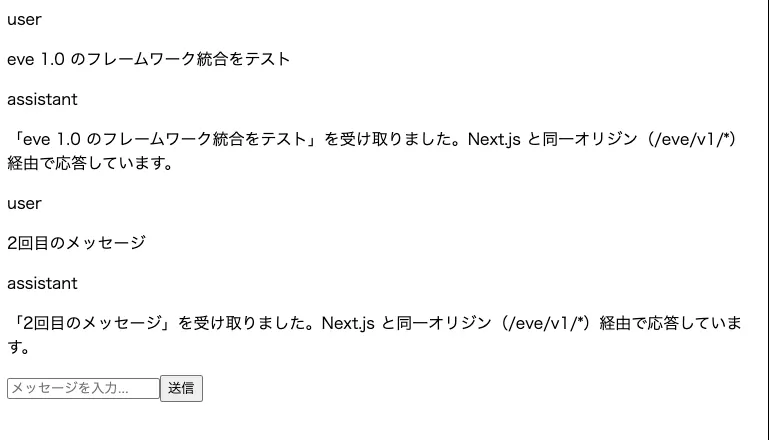
Two turns of user messages and assistant replies rendered on screen without errors. In the Network tab of DevTools, every request was sent to the same origin, as shown below.
- Session creation on the first turn:
POST http://localhost:3123/eve/v1/session - Stream subscription:
GET http://localhost:3123/eve/v1/session/<sessionId>/stream - Follow-up message on the second turn:
POST http://localhost:3123/eve/v1/session/<sessionId>
Summary
- eve 1.0 framework integrations keep the agent as an independent service while automating things like starting it during development and proxying it on the same origin
- They support five frameworks: Next.js, Nuxt, SvelteKit, TanStack Start, and Vite. On the client side,
useEveAgent(React / Vue / Svelte) handles streaming replies and session state with a shared model - With Next.js, you can choose between the Vercel services setup, which uses
vercel.ts, and the Next.js hosting setup, which wrapsnext.config.tswithwithEve() - With the Next.js hosting setup, starting the Next.js development server with
npm run devalso starts the eve development server automatically, and we confirmed that the browser communicates with the agent on the same origin