
Express + TypeScript + MondoDBでやる
Expressは、Node.jsのWebアプリケーションでもっとも利用されているフレームワークです。Expressは、HTTPによるWeb上の相互作用とNOde.jsプラットフォームの中間に位置するので、ある種のミドルウェアと言えます。 Expressを利用して、MVCモデルのアプリケーションを開発してみます。 データベースにはMongoDBを利用し、さらにTypeScriptで書いてみます。
はじめに
Express は、Node.js の Web アプリケーションでもっとも利用されているフレームワークです。Express は、HTTP による Web 上の相互作用と NOde.js プラットフォームの中間に位置するので、ある種のミドルウェアと言えます。 Express を利用して、MVC モデルのアプリケーションを開発してみます。
データベースには MongoDB を利用します。MongoDB はドキュメント型の NoSQL であり、JSON の構造をそのままデータとして保存できます。 MongoDB は以下のような特徴を持ちます。
- トランザクションを持っていないが、データの読み書きは RDB よりも早い
- スキーマがない
- クエリは JavaScript で行う
- SQL の
GROUP BYのような集約クエリを持っている
さらに、今回 TypeScript を導入してみます。 TypeScript の型定義により、より安全なコードとエディタのインテリセンスによる開発体験の向上を狙います。
開発環境の構築
さっそくはじめていきますが、まずはコードが動く最小限のところから初めます。
適当な場所でディレクトリを作成して移動しましょう。
mkdir express-ts
cd express-ts
npm init -y でプロジェクトルートに package.json を設置します。
{
  "name": "express-ts",
  "version": "1.0.0",
  "description": "",
  "main": "index.js",
  "scripts": {
    "test": "echo \"Error: no test specified\" && exit 1"
  },
  "author": "",
  "license": "ISC"
}
express をインストールします。
npm i express TypeScript や型定義、TypeScript コードのまま Express サーバーを実行するための ts-node-deb をインストールします。
npm i -D typescript @types/node @types/express ts-node-devサーバーを起動するための npm script を package.json に記述しておきましょう。
"scripts": {
    "test": "echo \"Error: no test specified\" && exit 1",
    "serve": "ts-node-dev src/server/index.ts"
  },
最終的に package.json は次のようになります。
{
  "name": "express-ts",
  "version": "1.0.0",
  "description": "",
  "main": "index.js",
  "scripts": {
    "test": "echo \"Error: no test specified\" && exit 1",
    "serve": "ts-node-dev src/main.ts"
  },
  "author": "",
  "license": "ISC",
  "dependencies": {
    "express": "^4.17.1"
  },
  "devDependencies": {
    "@types/express": "^4.17.6",
    "@types/node": "^14.0.13",
    "ts-node-dev": "^1.0.0-pre.44",
    "typescript": "^3.9.5"
  }
}最後に、tsconfig.json を tsc --init で生成します。
生成できたら、"moduleResolution": "node" のコメントを外します。
{
  "compilerOptions": {
    /* Basic Options */
    // "incremental": true,                   /* Enable incremental compilation */
    "target": "es5" /* Specify ECMAScript target version: 'ES3' (default), 'ES5', 'ES2015', 'ES2016', 'ES2017', 'ES2018', 'ES2019' or 'ESNEXT'. */,
    "module": "commonjs" /* Specify module code generation: 'none', 'commonjs', 'amd', 'system', 'umd', 'es2015', or 'ESNext'. */,
    // "lib": [],                             /* Specify library files to be included in the compilation. */
    // "allowJs": true,                       /* Allow javascript files to be compiled. */
    // "checkJs": true,                       /* Report errors in .js files. */
    // "jsx": "preserve",                     /* Specify JSX code generation: 'preserve', 'react-native', or 'react'. */
    // "declaration": true,                   /* Generates corresponding '.d.ts' file. */
    // "declarationMap": true,                /* Generates a sourcemap for each corresponding '.d.ts' file. */
    // "sourceMap": true,                     /* Generates corresponding '.map' file. */
    // "outFile": "./",                       /* Concatenate and emit output to single file. */
    // "outDir": "./",                        /* Redirect output structure to the directory. */
    // "rootDir": "./",                       /* Specify the root directory of input files. Use to control the output directory structure with --outDir. */
    // "composite": true,                     /* Enable project compilation */
    // "tsBuildInfoFile": "./",               /* Specify file to store incremental compilation information */
    // "removeComments": true,                /* Do not emit comments to output. */
    // "noEmit": true,                        /* Do not emit outputs. */
    // "importHelpers": true,                 /* Import emit helpers from 'tslib'. */
    // "downlevelIteration": true,            /* Provide full support for iterables in 'for-of', spread, and destructuring when targeting 'ES5' or 'ES3'. */
    // "isolatedModules": true,               /* Transpile each file as a separate module (similar to 'ts.transpileModule'). */

    /* Strict Type-Checking Options */
    "strict": true /* Enable all strict type-checking options. */,
    // "noImplicitAny": true,                 /* Raise error on expressions and declarations with an implied 'any' type. */
    // "strictNullChecks": true,              /* Enable strict null checks. */
    // "strictFunctionTypes": true,           /* Enable strict checking of function types. */
    // "strictBindCallApply": true,           /* Enable strict 'bind', 'call', and 'apply' methods on functions. */
    // "strictPropertyInitialization": true,  /* Enable strict checking of property initialization in classes. */
    // "noImplicitThis": true,                /* Raise error on 'this' expressions with an implied 'any' type. */
    // "alwaysStrict": true,                  /* Parse in strict mode and emit "use strict" for each source file. */

    /* Additional Checks */
    // "noUnusedLocals": true,                /* Report errors on unused locals. */
    // "noUnusedParameters": true,            /* Report errors on unused parameters. */
    // "noImplicitReturns": true,             /* Report error when not all code paths in function return a value. */
    // "noFallthroughCasesInSwitch": true,    /* Report errors for fallthrough cases in switch statement. */

    /* Module Resolution Options */
    "moduleResolution": "node" /* Specify module resolution strategy: 'node' (Node.js) or 'classic' (TypeScript pre-1.6). */,
    // "baseUrl": "./",                       /* Base directory to resolve non-absolute module names. */
    // "paths": {},                           /* A series of entries which re-map imports to lookup locations relative to the 'baseUrl'. */
    // "rootDirs": [],                        /* List of root folders whose combined content represents the structure of the project at runtime. */
    // "typeRoots": [],                       /* List of folders to include type definitions from. */
    // "types": [],                           /* Type declaration files to be included in compilation. */
    // "allowSyntheticDefaultImports": true,  /* Allow default imports from modules with no default export. This does not affect code emit, just typechecking. */
    "esModuleInterop": true /* Enables emit interoperability between CommonJS and ES Modules via creation of namespace objects for all imports. Implies 'allowSyntheticDefaultImports'. */,
    // "preserveSymlinks": true,              /* Do not resolve the real path of symlinks. */
    // "allowUmdGlobalAccess": true,          /* Allow accessing UMD globals from modules. */

    /* Source Map Options */
    // "sourceRoot": "",                      /* Specify the location where debugger should locate TypeScript files instead of source locations. */
    // "mapRoot": "",                         /* Specify the location where debugger should locate map files instead of generated locations. */
    // "inlineSourceMap": true,               /* Emit a single file with source maps instead of having a separate file. */
    // "inlineSources": true,                 /* Emit the source alongside the sourcemaps within a single file; requires '--inlineSourceMap' or '--sourceMap' to be set. */

    /* Experimental Options */
    // "experimentalDecorators": true,        /* Enables experimental support for ES7 decorators. */
    // "emitDecoratorMetadata": true,         /* Enables experimental support for emitting type metadata for decorators. */

    /* Advanced Options */
    "forceConsistentCasingInFileNames": true /* Disallow inconsistently-cased references to the same file. */
  }
}
簡単なExpressサーバー
これで環境構築は終了です。ちゃんと動くか試しに簡単な「Hello」と出力するサーバーを構築してみます。
src フォルダを作成し、その中に main.ts というファイルを作成してください。
import Express from 'express'

const app = Express()
const port = 3000

app.get('/', (req, res) => {
  const data = { message: 'Hello' }
  res.send(data)
})

app.listen(port, () => {
  console.log('server start')
})
Express モジュールには、Web サーバー機能を組み込んだクラスが含まれています。その Express アプリケーションを実体化したものを慣例的に app という変数に代入して使用します。
app.get() は GET リクエストを処理します。第一引数でパスを受け取り、第二引数でコールバックをうけとります。
npm serve でアプリケーションを実行して、http://localhost:3000へアクセスしましょう。メッセージがレスポンスとして帰ってきているはずです。
ルーティングを設定する
サーバーからのレスポンスを受け取ることができたので、ルーティングを設定しましょう。
src フォルダの下に routes フォルダを作成し、index.ts ファイルを配置します。
router/index.ts はすべてのルートをまとめるファイルです。
routes/index.ts
import Express from 'express'
import userRoutes from './userRoutes'
import homeRoutes from './homeRoutes'

const router = Express.Router()

router.use('/users', userRoutes)
router.use('/', homeRoutes)

export default router
Express.Router() はルーティングに関する機能を提供します。
router.use() で名前空間を追加します。
/users というプレフィックがついたルートは、すべて userRoutes モジュールのルートを利用します。
routes フォルダ配下に userRoutes.ts ファイルを作成して、/users ルートを作成します。
routes/userRoutes.ts
import Express from 'express'
import usersController from '../controllers/usersController'

const router = Express.Router()

router.get('/', usersController.index)

export default router
router.get('/', usersController.index) のルートは、/users/ へ GET リクエストを送ったときに処理されます。
ここでは、実際処理は直接コールバックを記述するのではなく、usersController に任せます。コントローラーは、ビューとモデルを結びつけ。リクエストを受信したとき、適切なレスポンスを返します。
src フォルダの下に controllers フォルダを作成し、usersController.ts を作成します。
usersController.ts
import Express from 'express'

export default {
  index: (req: Express.Request, res: Express.Response) => {
    res.send('<h1>User index</h1>')
  },
}
今はまだ簡単なレスポンスを返すだけです。型指定のために express をインポートしています。
homeRoutes.ts、homeController.ts も同じように作成します。
import Express from 'express'
import homeController from '../controllers/homeController'

const router = Express.Router()

router.get('/', homeController.index)

export default router
import Express from 'express'

export default {
  index: (req: Express.Request, res: Express.Response) => {
    res.send('<h1>Top Page</h1>')
  },
}
http://localhost:3000/とhttp://localhost:3000/usersをそれぞれ訪れて、正しくルーティングが行われているか確認してみましょう。


ビューを作成する
静的ファイルを設定する
ルーティングを作成したところで、ルーティングとビューを接続してみましょう。 まずは、静的ファイルを使用するフォルダを作成します。
ここでは、src フォルダに public フォルダを配置して、その中に images、css、js フォルダを作成します。
そうしたら、src/main.ts ファイル内で app.use(Express.static('public')) と記述し、Express に静的ファイルの置き場を教えます。
import Express from 'express'
import router from './routes'

const app = Express()
const port = 3000

app.use(Express.static('public'))
app.use('/', router)

app.listen(port, () => {
  console.log('server start')
})
public/css にはBootstrapをダウンロードして、bootstrap.css というファイル名で保存しておきます。
テンプレートエンジンを使用する
通常の HTML ファイルの代わりに、EJS と呼ばれるテンプレートエンジンを使用します。
EJSJavaScript のテンプレートエンジンの 1 つで、動的に変数を受け渡したり、共通のレイアウトファイルを設定したり、再利用できるパーシャルを利用できます。
まずは、npm i express-ejs-layouts ejs を実行して EJS テンプレートパッケージをインストールします。
express-ejs-layouts の型定義もインストールします。
npm i -D @types/express-ejs-layoutsさらに、main.ts でテンプレートエンジンとして EJS を利用することを伝えます。
import Express from 'express'
import path from 'path'
import router from './routes'
import layouts from 'express-ejs-layouts'

const app = Express()
const port = 3000

app.set('view engine', 'ejs')
app.set('views', path.resolve(__dirname, 'views'))
app.use(layouts)
app.use(Express.static(__dirname + '/public'))
app.use('/', router)

app.listen(port, () => {
  console.log('server start')
})
ejsファイルの作成
プロジェクトルートに views フォルダを作成し、layout.ejs ファイルを作成します。
.ejs は EJS の拡張子です。
<!DOCTYPE html>
<html>

<head>
  <meta charset="utf-8">
  <meta name="viewport" content="width=device-width, initial-scale=0.8, maximum-scale=1">
  <title>Express </title>
  <link rel="stylesheet" href="/css/bootstrap.css">
  <link rel="stylesheet" href="/css/confetti_cuisine.css">
</head>

<body>
  <header>
    <div id="nav">
      <div class="col-sm nav-align">
        <h1 id="title">Express</h1>
      </div>
      <div class="col-sm nav-align">
        <a href="/">
          <span class="button">Home</span>
        </a>
        <a href="/users">
          <span class="button">Users</span>
        </a>
      </div>
    </div>
  </header>

  <div class="container">
    <%- body %>
  </div>

  <footer>
    footer
  </footer>
</body>

</html>レイアウトファイルには、<head> タグと全ページ共通であるヘッダーとフッターを配置します。
ボディ部分は、<%- body %> と記述されているところに描画されます。
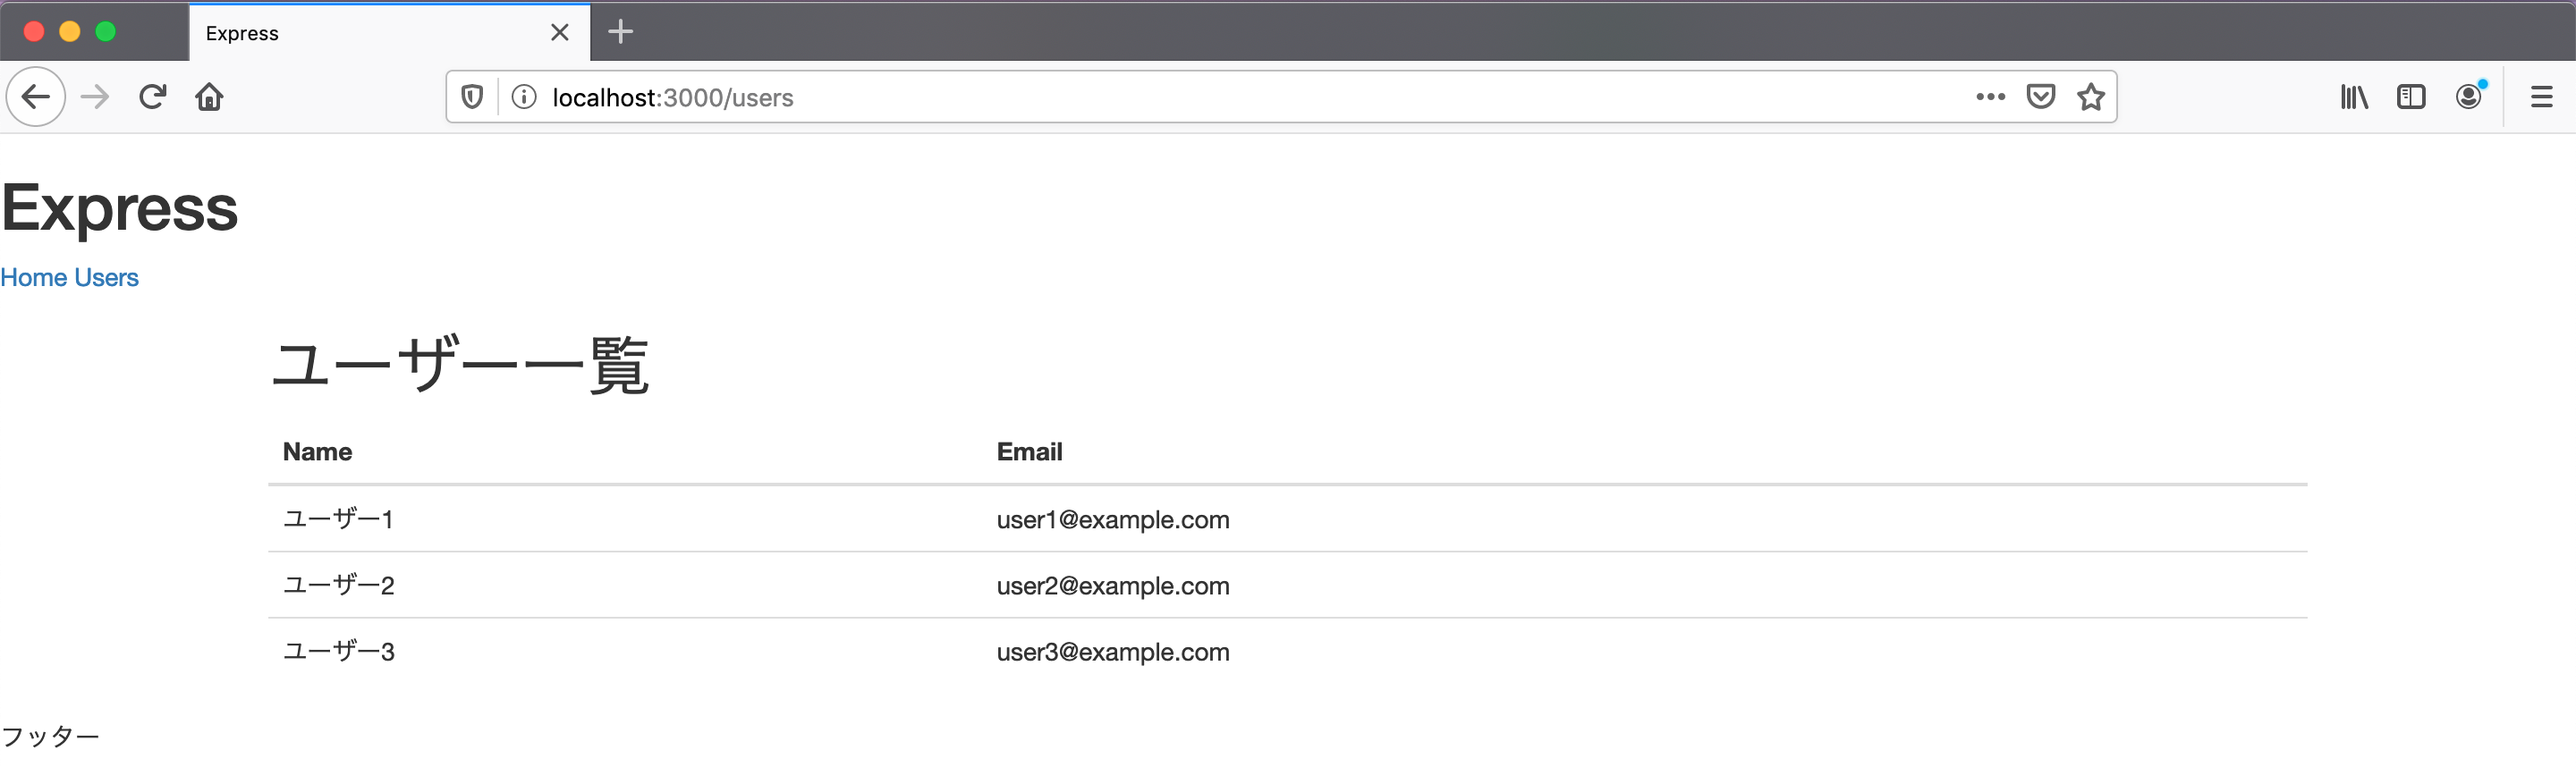
ついで、users フォルダを作成し、index.ejs を作成します。/users にリクエストが送られたときに描画するビューを作成します。
<h1>ユーザー一覧</h1>
<table class="table">
  <thead>
    <tr>
      <th>Name</th>
      <th>Email</th>
    </tr>
  </thead>
  <tbody>
    <% users.forEach(user => { %>
      <tr>
        <td>
          <%= user.name %>
        </td>
        <td><%= user.email %></td>
      </tr>
    <% }) %>
  </tbody>
</table>
<% %> で囲まれている部分は、JavaScript として解釈されます。
コントローラーから渡されたデータを使用できるので、受け取った users 変数を forEach でループして個々のユーザーデータを表示しています。
コントローラーに戻り、データを渡してみましょう。
import Express from 'express'
import * as User from '../models/userModel'

export default {
  index: (req: Express.Request, res: Express.Response) => {
    const users = User.find()
    res.render('users/index', { users })
  ,
}
res.render() の第一引数に views フォルダからみたパスを、第二引数にビューへ渡す変数をオブジェクトで渡します。
受け渡すデータはモデルから取得します。
src フォルダ下に models フォルダを作成し、userModel.ts ファイルを作成します。
type Sex = '男' | '女'

interface User {
  name: String
  email: String
  sex: Sex
  age: Number
}

const users: Array<User> = [
  {
    name: 'ユーザー1',
    email: '[email protected]',
    sex: '男',
    age: 19,
  },
  {
    name: 'ユーザー2',
    email: '[email protected]',
    sex: '男',
    age: 22,
  },
  {
    name: 'ユーザー3',
    email: '[email protected]',
    sex: '女',
    age: 33,
  },
]

export function find(): Array<User> {
  return users
}
とりあえず、適当なダミーデータを用意しておきます。
User モデルの find() 関数を実行すると、ユーザーデータを取得できます。
それでは、http://localhost:3000/usersを見てみましょう。 ユーザー一覧が表示されているはずです。
MongoDBでユーザーのCRUD操作
とりあえず、ユーザー一覧を表示させるところまで進みました。 しかし、あらかじめ用意していたデータのみしか表示できないのはあまりにも不便なため、MongoDB を導入してデータの永続化ができるようにします。
最終的には、CRUD 操作ができるようにルートを作成します。
MongoDBのインストール
次のコマンドを実行して、MongoDB をインストールします。 ここでは Homebrew を使用してインストールしています。
brew tap mongodb/brew
brew install [email protected]
以下のコマンドで起動します。
brew services start [email protected]Mongooseをインストールして、Node.jsアプリケーションに接続
Mongoose は、アプリケーションで MongoDB を使いやすくしてくれるための ODM(オブジェクトとドキュメントを対応させるためのツール)です。ORM と似たようなものです。
MongoDB は、本来はスキーマはありませんが、実際にアプリケーションを運営するうえでスキーマがあったほうがよいでしょう。Mongoose はドキュメントをモデル化してスキーマの構築を手助けしてくれます。
次のコマンドでインストールします。
npm i mongoose型定義もインストールいしましょう。
npm i @types/mongooseインストールが完了したら、main.ts で次のように接続します。
import Express from 'express'
import path from 'path'
import router from './routes'
import layouts from 'express-ejs-layouts'
import mongoose from 'mongoose'

mongoose.connect('mongodb://localhost:27017/test_db', {
  useNewUrlParser: true,
  useUnifiedTopology: true,
})

mongoose.Promise = global.Promise

const app = Express()
const port = 3000

app.set('view engine', 'ejs')
app.set('views', path.resolve(__dirname, 'views'))
app.use(layouts)
app.use(Express.static(__dirname + '/public'))
app.use('/', router)

app.listen(port, () => {
  console.log('server start')
})
mongodb://localhost:27017/ は MongoDB のローカルの接続先です。その後にデータベース名をしていします。このデータベース名は存在しなければ自動で作成してくれます。
その後、Monngoose で Promise を使用するために mongoose.Promise = global.Promise で代入しています。
ユーザーモデルを構築する
Monngose を使用して、ユーザースキーマモデルを構築します。
models/userModel に実装します。
import mongoose, { Schema, Document } from 'mongoose'

type Sex = '男' | '女'

export interface User extends Document {
  firstName: String
  lastName: String
  email: String
  age: Number
  sex: Sex
}

const userSchema: Schema = new Schema(
  {
    firstName: {
      type: String,
      trim: true,
      required: true,
    },
    lastName: {
      type: String,
      trim: true,
      required: true,
    },
    email: {
      type: String,
      required: true,
      unique: true,
    },
    age: {
      type: Number,
      required: true,
    },
    sex: {
      type: String,
      required: true,
    },
  },
  {
    timestamps: true,
  }
)

userSchema.virtual('fullName').get(function(this: User) {
  return `${this.firstName} ${this.lastName}`
})

export default mongoose.model<User>('User', userSchema)
TypeScript でスキーマを構築するためには、スキーマとは別に Document を継承したインターフェースを作成する必要があります。
mongoose.Schema が提供するコンストラクタにパラメータを渡すことでスキーマを構築できます。
スキーマでは型定義だけでなく、required や unique などのオプションも使用可能です。
timestams オプションを設定すると、自動で created_at、updated_at フィールドを設定してくれます。
mongoose.Schema メソッドの virtual はデータベースが提供しない仮想のフィールドを使用できます。
この例ではユーザーのフルネームを返し、fullName というプロパティでアクセスできます。
最後に、mongoose.model() にスキーマを渡して、モデルが作成されます。
このとき、ジェネリクスで呼び出すようにします。
ユーザー一覧の修正
モデルを mongoose で構築するように修正したので、コントローラーの実装も修正します。
import Express from 'express'
import User from '../models/userModel'

export default {
  index: async (
    req: Express.Request,
    res: Express.Response,
    next: Express.NextFunction
  ) => {
    try {
      const users = await User.find({}).exce()
      res.locals.users = users
      next()
    } catch (err) {
      next(err)
    }
  },
  indexView: (req: Express.Request, res: Express.Response) => {
    res.render('users/index')
  },
}データベースへの接続は失敗することがあるので、index() はミドルウェア関数として実装します。
ミドルウェアはリクエスト(req)、レスポンス(res)と次のミドルウェアの呼び出し関数(next)を受け取る関数でリクエストに処理を挟むことができます。
ミドルウェアで例えばロギングをしたり、認証をしたあとに、next() を呼び出すことで、次のミドルウェア関数へ処理を渡します。
ミドルウェア関数では、確実に next() を呼ばなければいけないことに注意してください。さもないと、無限ループに陥りスタックオーバーフローが発生します。
try/catch 構文で処理をし、エラーは発生した場合には next() にエラーを渡しミドルウェア関数でエラーは発生したことを伝えます。
ルーティングも次のように修正します。
import Express from 'express'
import usersController from '../controllers/usersController'

const router = Express.Router()

router.get('/', usersController.index, usersController.indexView)

export default router
データを入れて確認
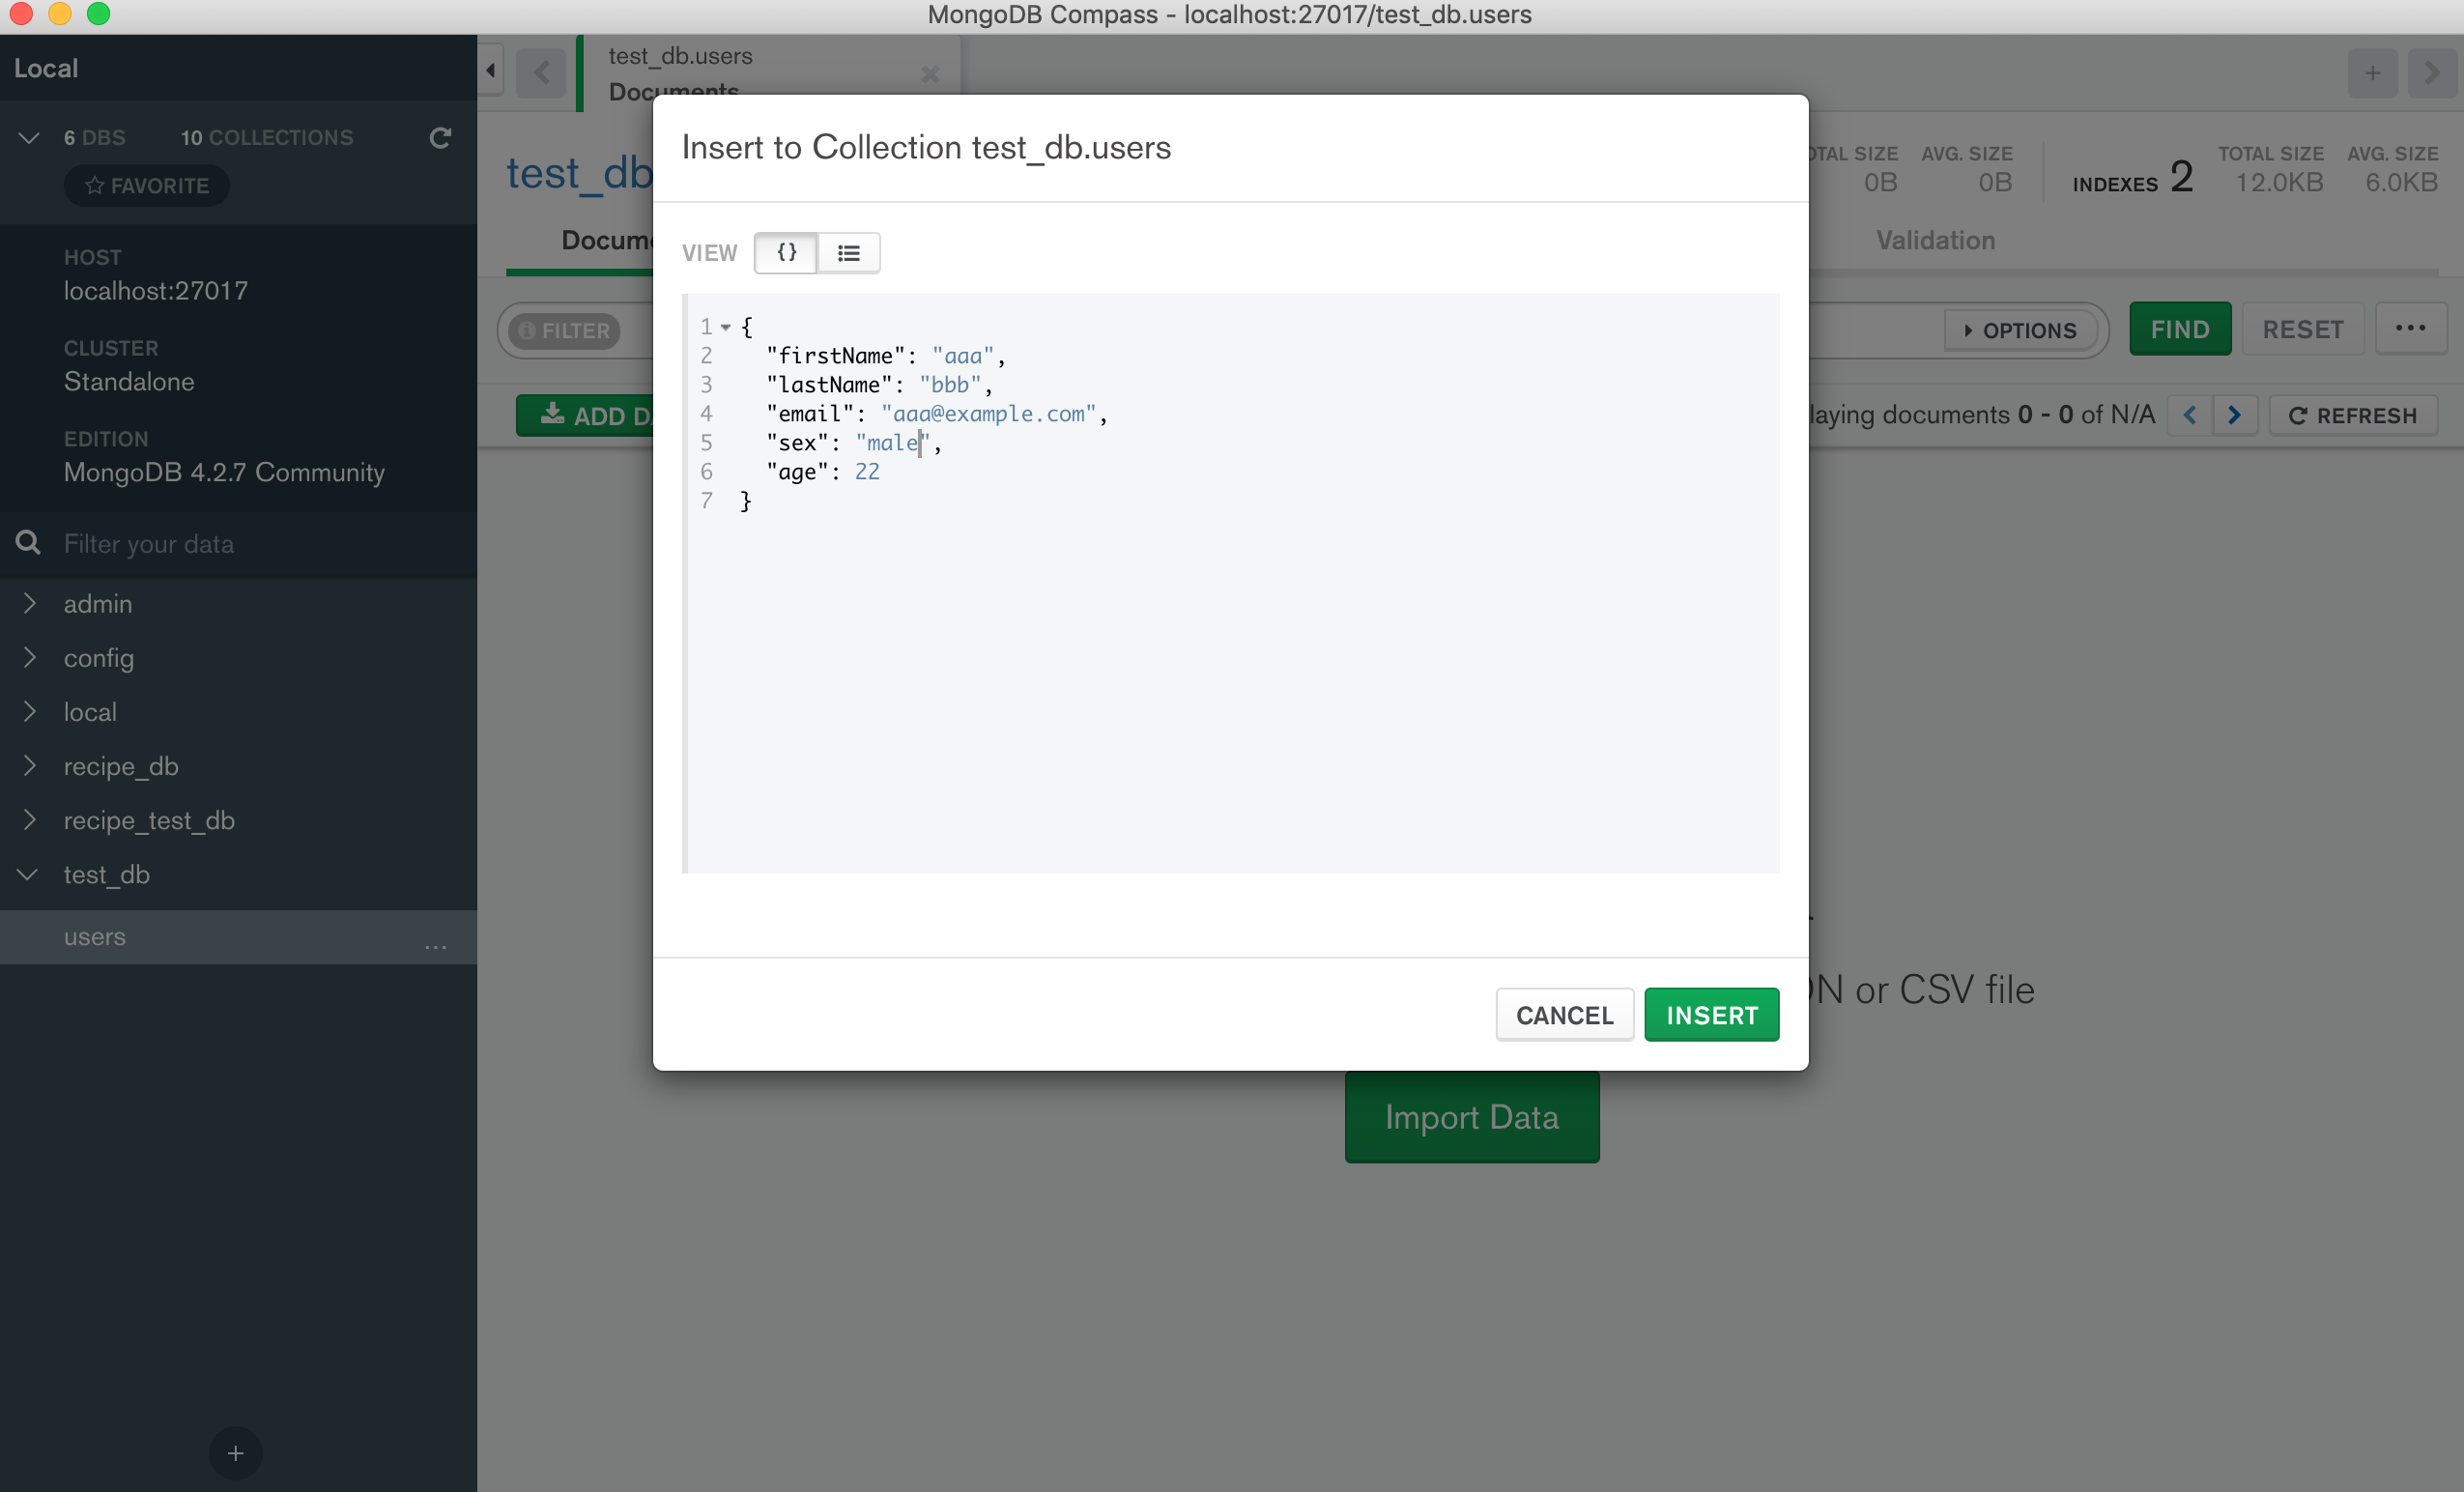
MongoDB にデータを入れてみて表示を確認してみましょう。
MongoDB の GUI 操作には、MongoDB compassが便利です。
ローカルに接続し、データベースとテーブルを選んでインサートします。
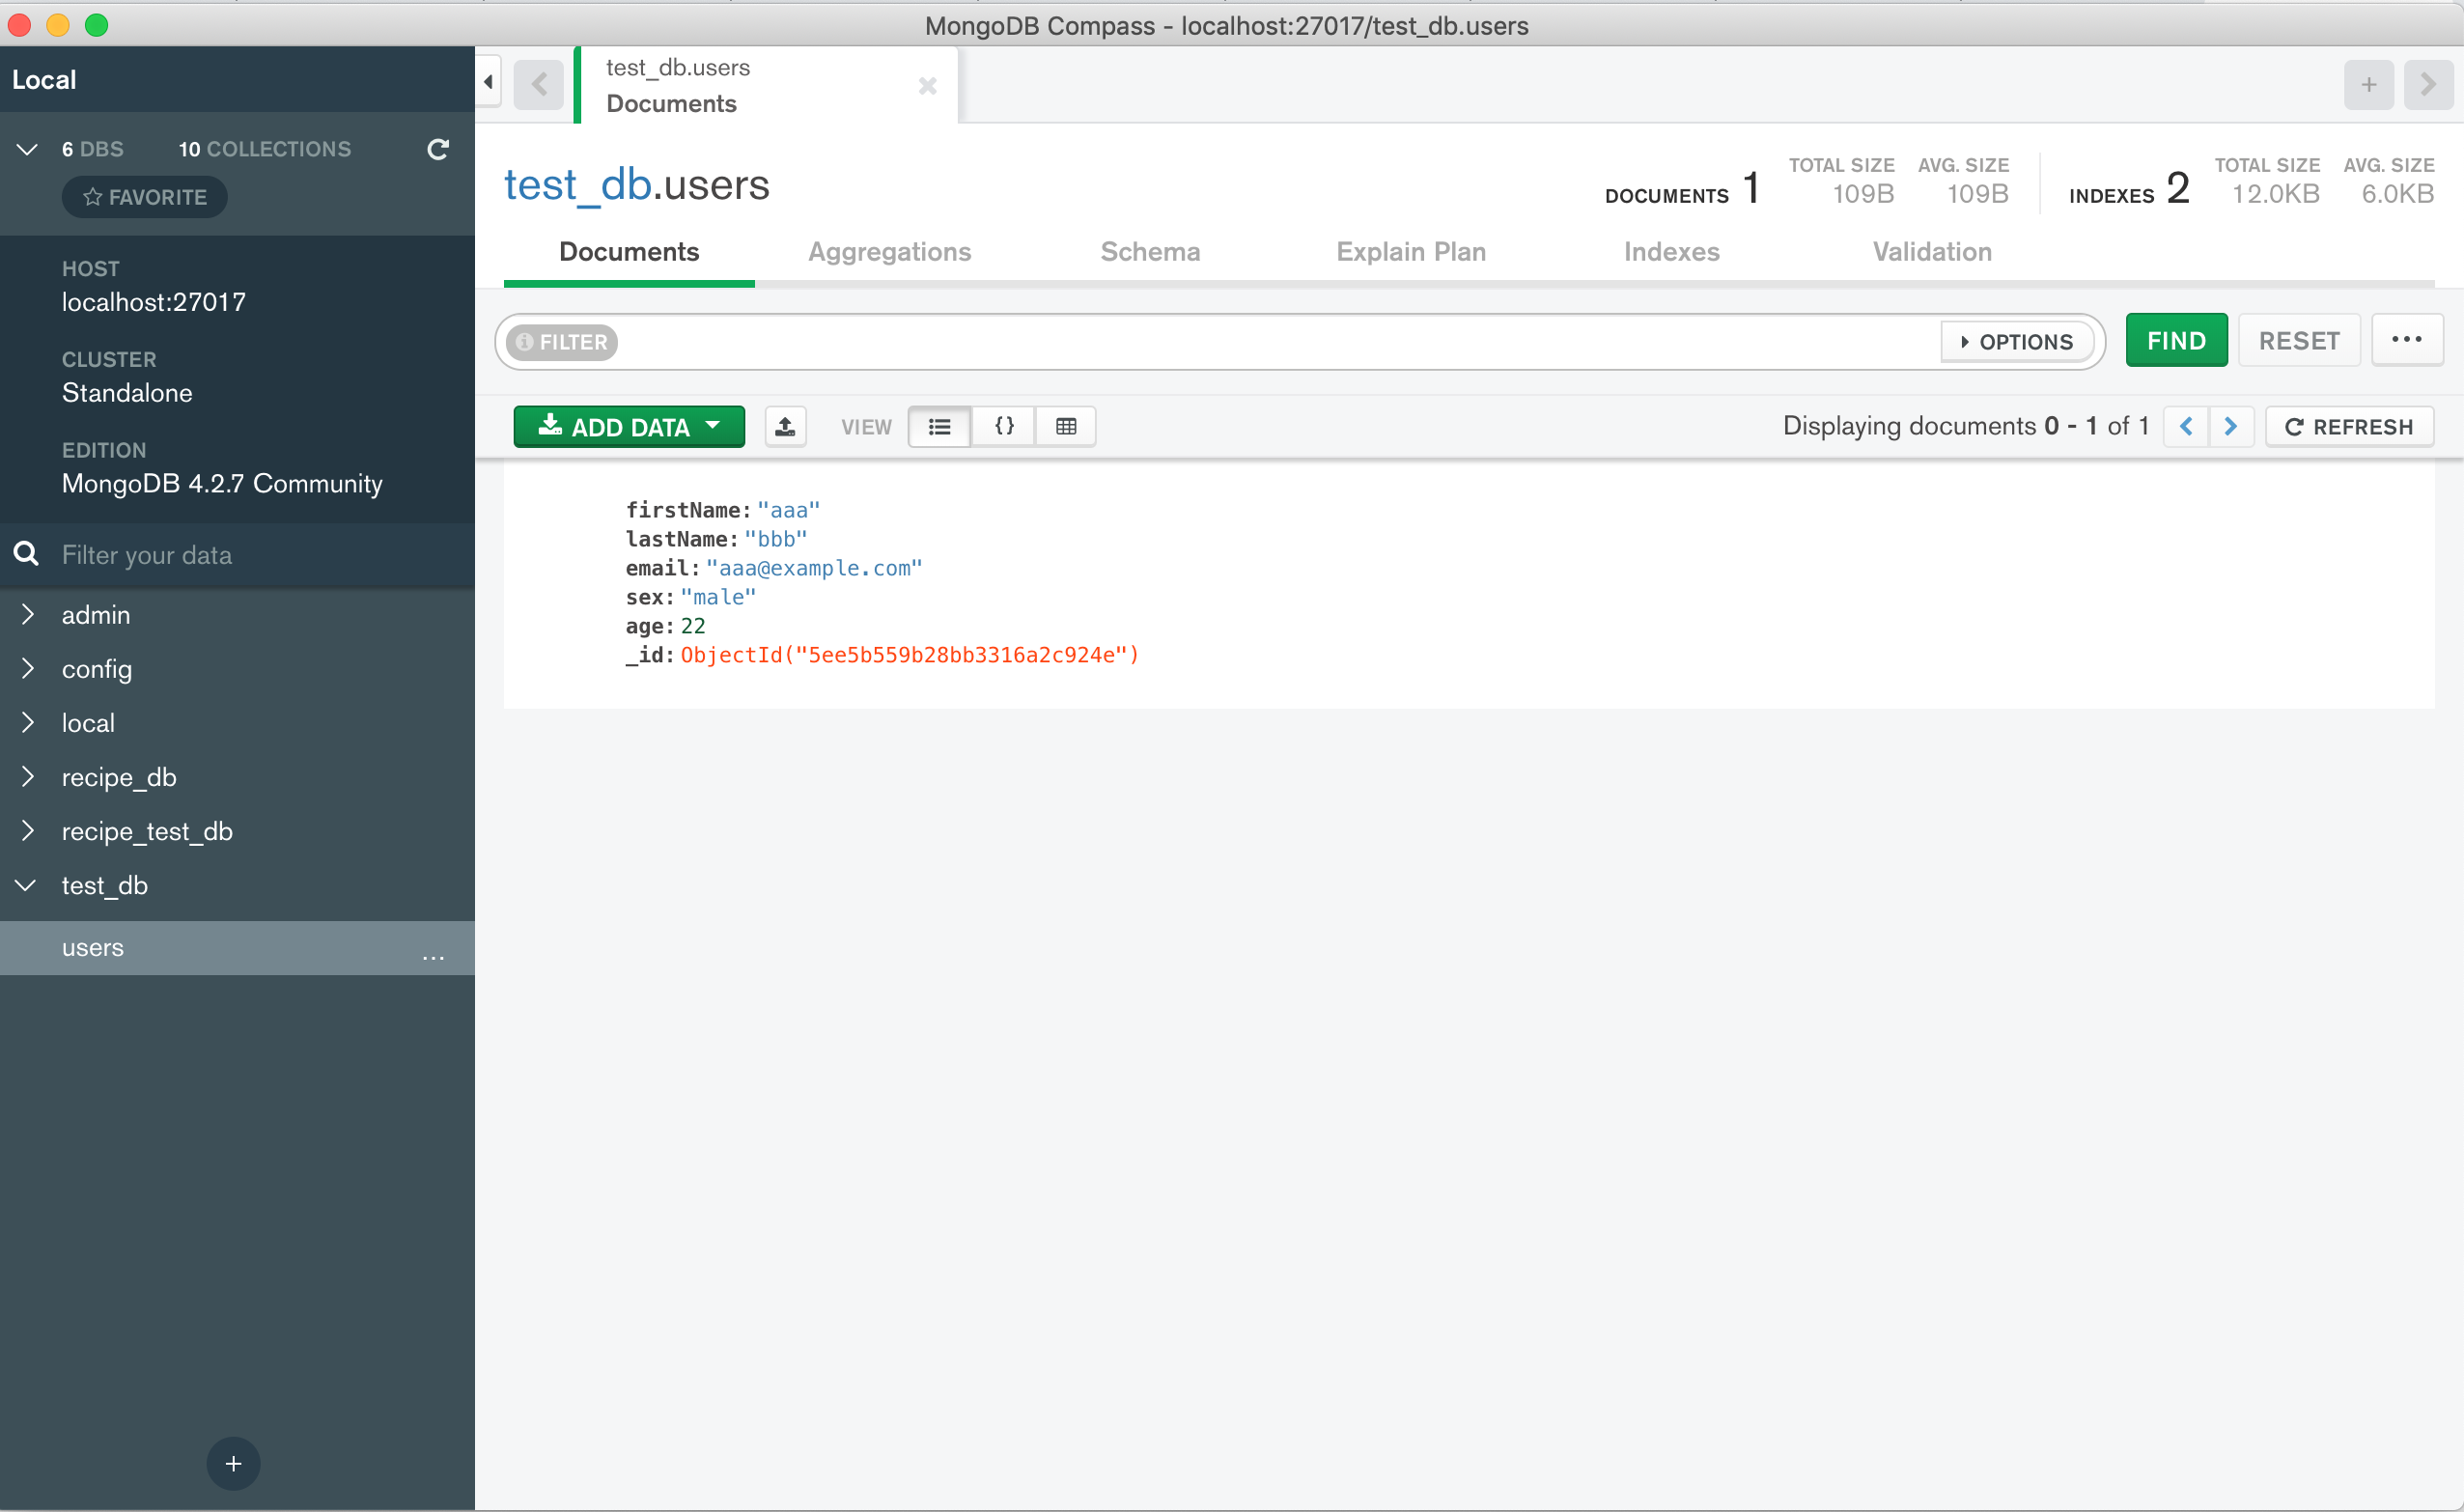
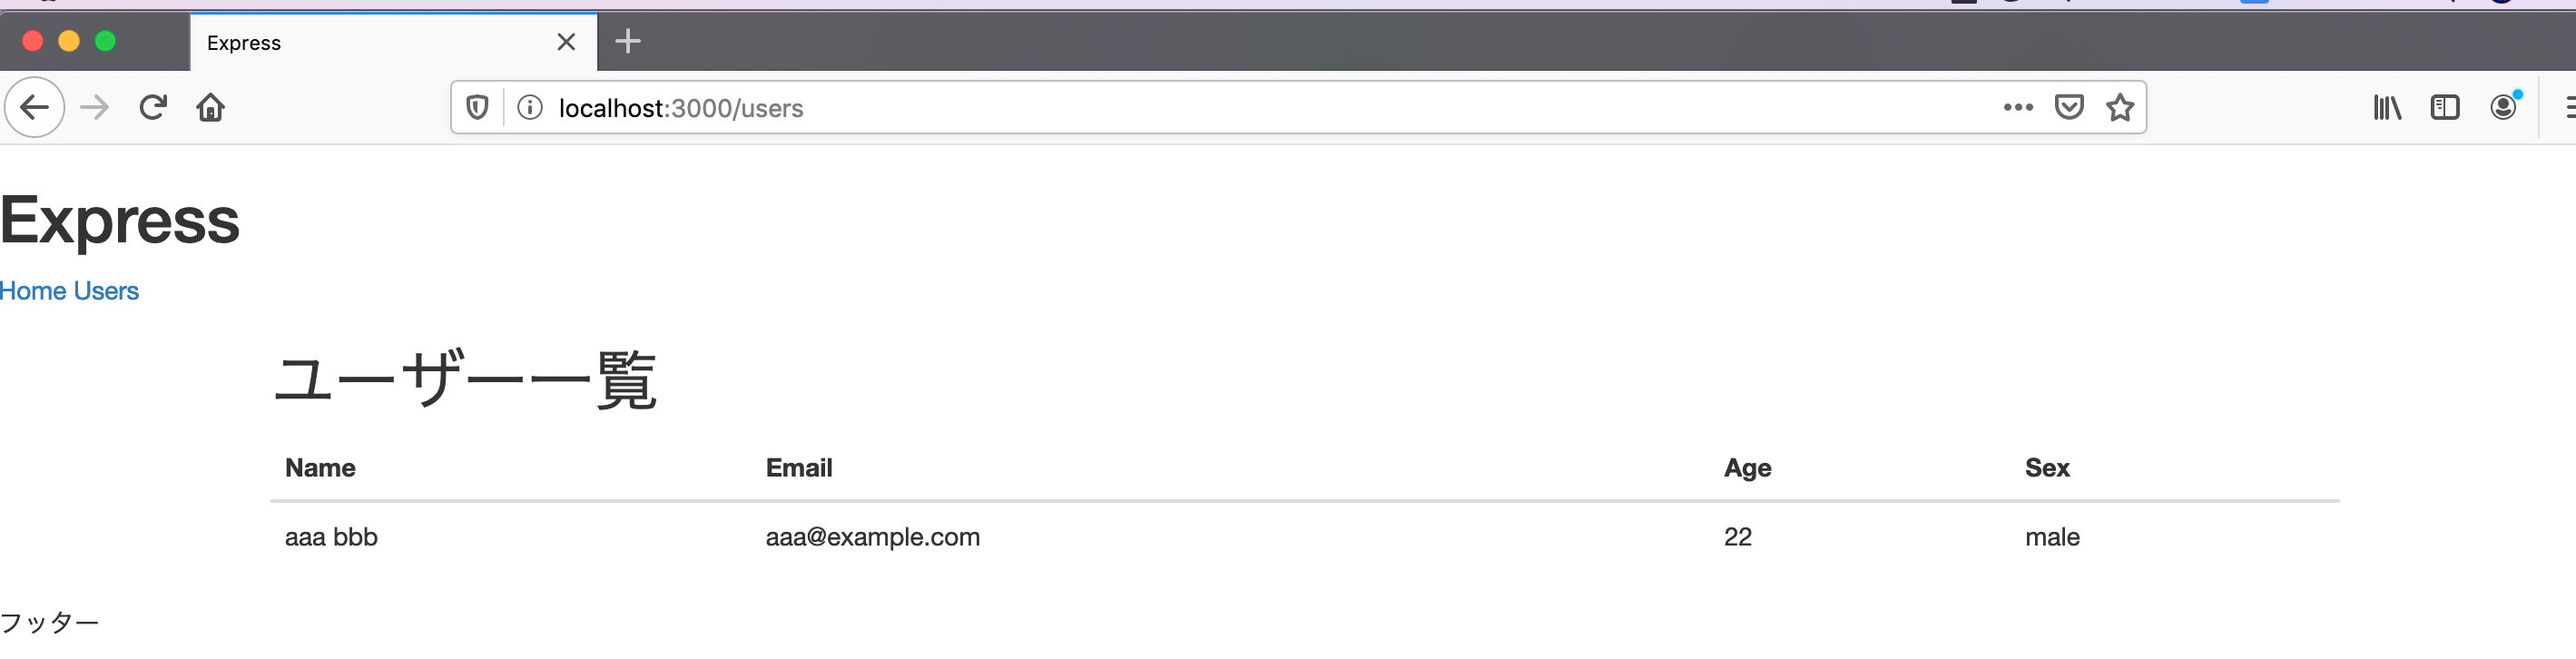
投入したユーザーデータが表示されました。
ユーザーの作成
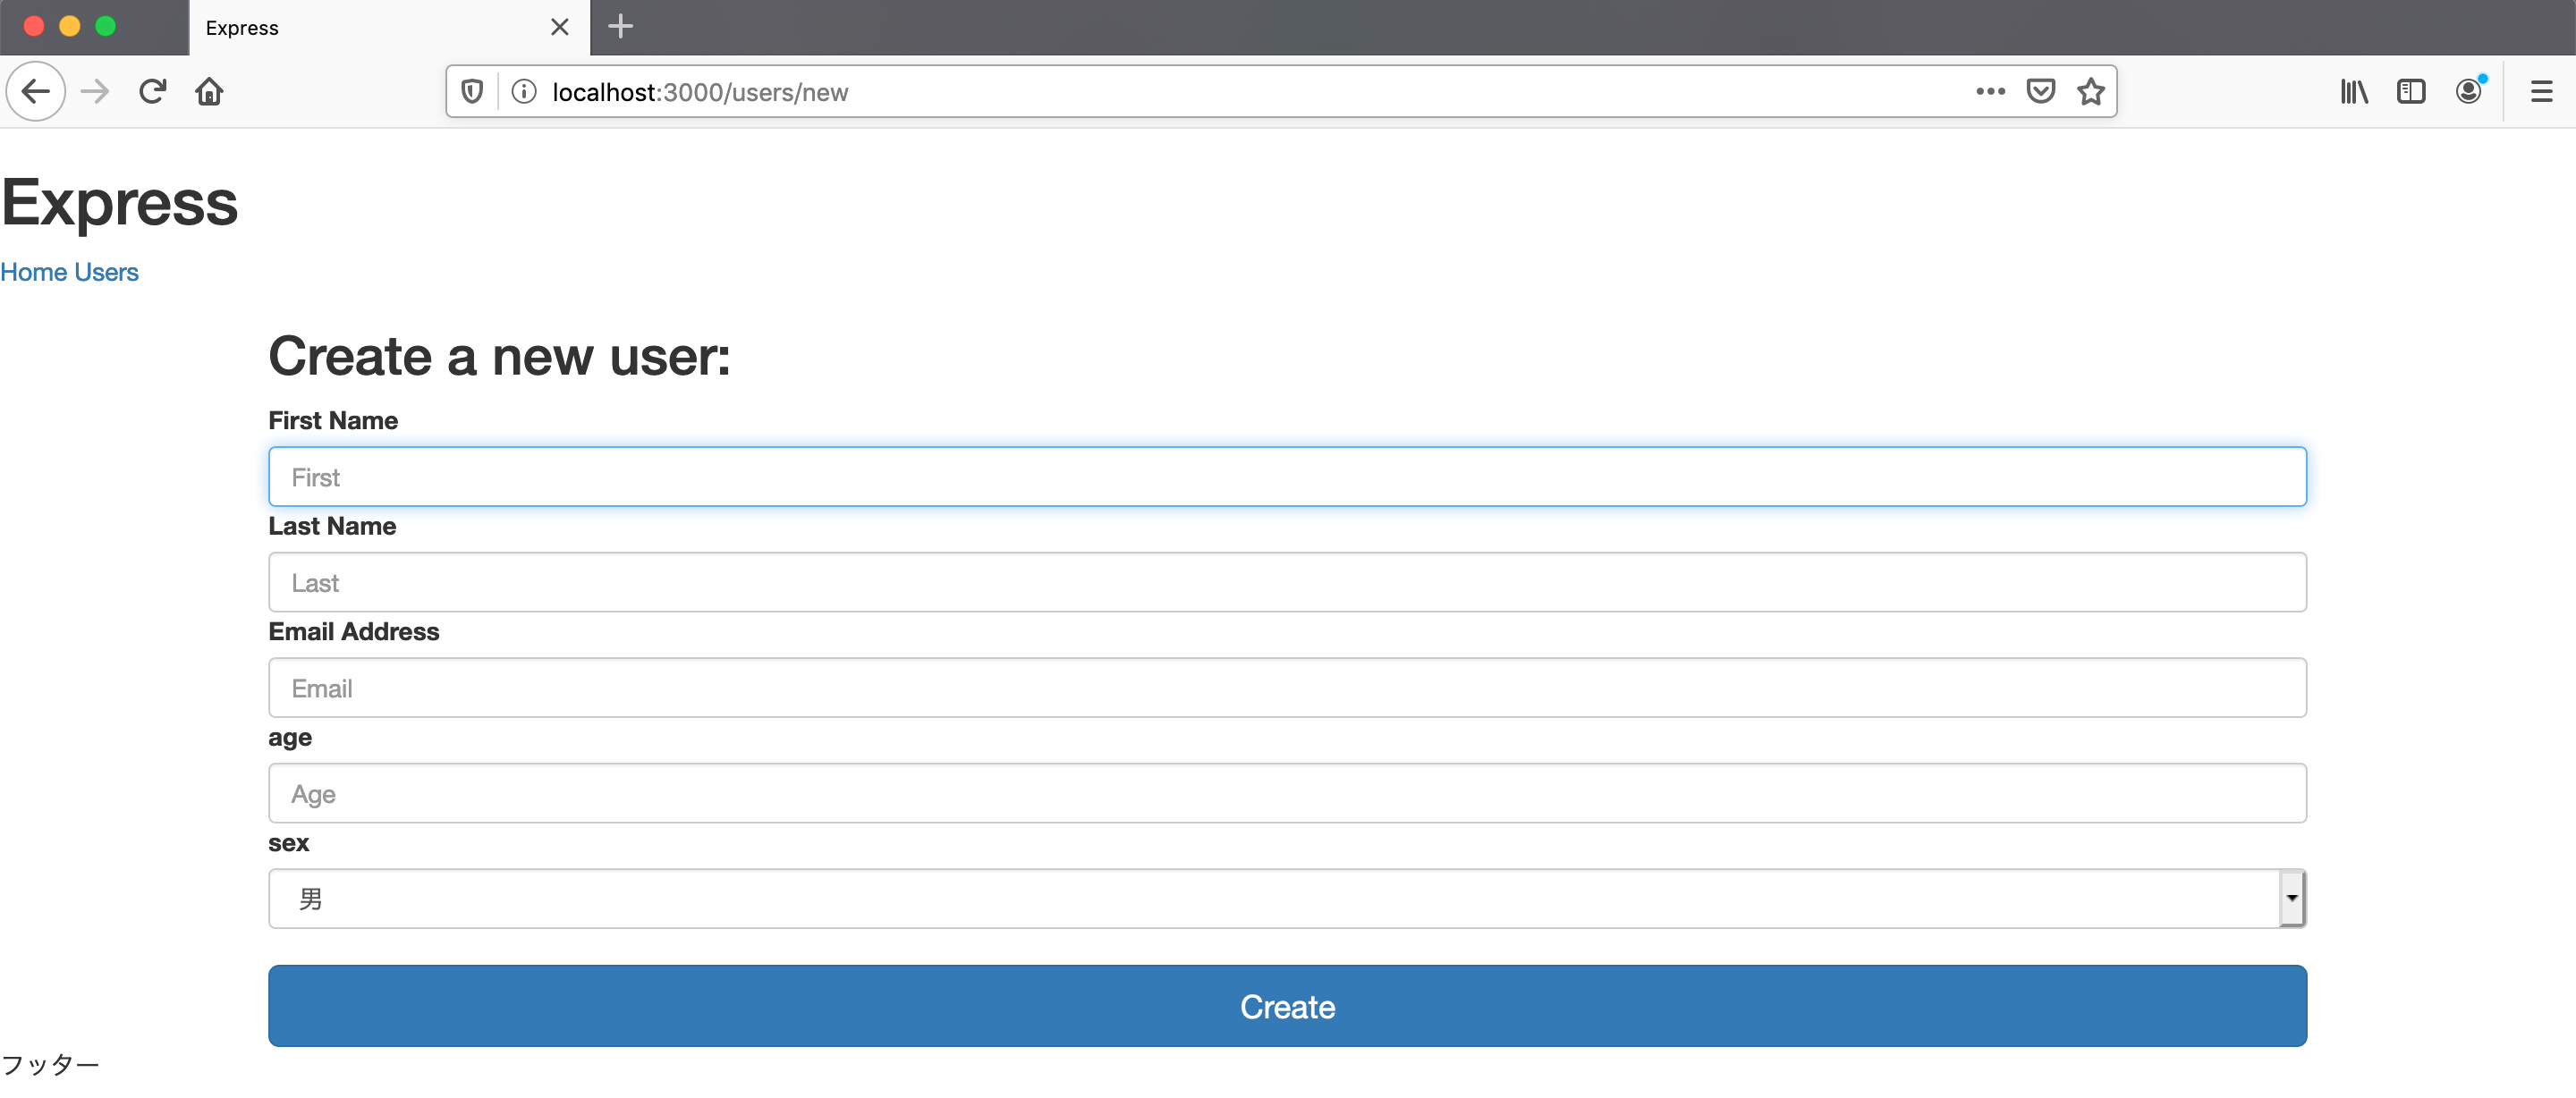
フォームの作成
アプリケーションから新規ユーザーを作成できるように、作成フォームを作りましょう。
views/users フォルダの下に、new.ejs というファイルを作成します。
<div class="data-form">
  <form class="form-signin" action="/users/create" method="POST">
    <h2>Create a new user:</h2>
    <label for="inputFirstName">First Name</label>
    <input class="form-control" type="text" name="first" id="inputFirstName" placeholder="First" autofocus required>
    <label for="inputLastName">Last Name</label>
    <input class="form-control" type="text" name="last" id="inputLastName" placeholder="Last" required>
    <label for="inputEmail">Email Address</label>
    <input class="form-control" type="email" name="email" id="inputEmail" placeholder="Email" required>
    <label for="inputAge">age</label>
    <input class="form-control" type="text" name="age" id="inputAge" placeholder="Age" required>
    <label for="inputSex">sex</label>
    <select name="sex" id="inputSex" class="form-control">
      <option value="男">男</option>
      <option value="女">女</option>
    </select>
    <br /><button class="btn btn-lg btn-primary btn-block" type="submit">Create</button>
  </form>
</div>
コントローラーとルーティングも追加します。
import Express from 'express'
import User from '../models/userModel'

export default {
  index: async (
    req: Express.Request,
    res: Express.Response,
    next: Express.NextFunction
  ) => {
    try {
      const users = await User.find({}).exec()
      res.locals.users = users
      next()
    } catch (err) {
      next(err)
    }
  },
  indexView: (req: Express.Request, res: Express.Response) => {
    res.render('users/index')
  },
  new: (req: Express.Request, res: Express.Response) => {
    res.render('users/new')
  },
}
import Express from 'express'
import usersController from '../controllers/usersController'

const router = Express.Router()

router.get('/', usersController.index, usersController.indexView)
router.get('/new', usersController.new)

export default router
users/new にアクセスして確認します。
リクエストを受け取れるようにする
Express でリクエストパラメータを受け取れるようにするために、main.ts に次のように追記します。
import bodyParser from 'body-parser'

app.use(bodyParser())
createアクション
実際にリクエストパラメータを受け取りデータベースに保存する create アクションを実装します。
リクエストパラメータは res.body から受け取ることができます。
import Express from 'express'
import User, { User as UserDoc } from '../models/userModel'

export default {
  index: async (
    req: Express.Request,
    res: Express.Response,
    next: Express.NextFunction
  ) => {
    try {
      const users = await User.find({}).exec()
      res.locals.users = users
      next()
    } catch (err) {
      next(err)
    }
  },
  indexView: (req: Express.Request, res: Express.Response) => {
    res.render('users/index')
  },
  new: (req: Express.Request, res: Express.Response) => {
    res.render('users/new')
  },
  create: async (
    req: Express.Request,
    res: Express.Response,
    next: Express.NextFunction
  ) => {
    const userParams = req.body as UserDoc
    try {
      await User.create(userParams)
      res.locals.redirect = '/users'
      next()
    } catch (err) {
      next(err)
    }
  },
  redirectView: (
    req: Express.Request,
    res: Express.Response,
    next: Express.NextFunction
  ) => {
    const redirect = res.locals.redirect
    if (redirect) {
      res.redirect(redirect)
    } else {
      next()
    }
  },
}ドキュメントの作成は、create() メソッドを使用します。
ユーザーの作成に成功したら redirectView アクションへ渡します。
ルーティングを追記しましょう。
import Express from 'express'
import usersController from '../controllers/usersController'

const router = Express.Router()

router.get('/', usersController.index, usersController.indexView)
router.get('/new', usersController.new)
router.post('/create', usersController.create, usersController.redirectView)

export default router
ユーザーデータを読み出して更新
次は、update アクションを作成します。edit.ejs ファイルを作成します。
作成用のフォームとよく似ていますが、初期値としてユーザーのデータを埋め込みます。
<div class="data-form">
  <form class="form-signin" action="<%= `/users/${user._id}/update?_method=PUT` %>" method="post">
    <h2 class="form-signin-heading">Edit User</h2>
    <label for="inputFirstName">First Name</label>
    <input type="text" name="first" id="inputFirstName" class="form-control" placeholder="First"
      value="<%= user.firstName %>" autofocus>
    <label for="inputLastName">Last Name</label>
    <input type="text" name="last" id="inputLastName" value="<%= user.lastName %>" class="form-control"
      placeholder="Last">
    <label for="inputPassword">Password</label>
    <input type="email" name="email" id="inputEmail" placeholder="Email" value="<%= user.email %>" class="form-control"
      required>
    <label for="inputAge">Age</label>
    <input type="text" name="age" id="inputAge" value="<%= user.age %>" class="form-control" placeholder="Age" required>
    <select name="sex" id="inputSex" class="form-control">
      <option value="男">男</option>
      <option value="女">女</option>
    </select>
    <br>
    <button class="btn btn-lg btn-primary btn-block" type="submit">Update</button>
  </form>
</div>
更新フォームへのパスは users/:id/edit です。ルーティングにコロン(:)を使うと動的にルーティングさせることができます。
index.ejs から更新フォームへアクセスできるようにしておきましょう。
<td>
  <a href="<%= `/users/${user._id}.edit` %>">Edit</a>
</td>
さて、更新のリクエストを送信するときには、PUT リクエストを送信できるようにしたいです。 しかし。HTML フォームがサポートしているリクエストは GET と POST だけだのでこのままでは実現できません。
そのため、HTTP リクエストを書き換えるパッケージを使用します。
npm i method-override
npm i -D @types/method-override
main.ts に method-override を使うように追記します。
import methodOverride from 'method-override'

app.use(methodOverride('_method', {
  methods: ['POST', 'GET']
}))
method-override は、URL に _method というクエリパラメータを見つけたら、そのパラメータの値として指定されたメソッドを使ってそのリクエストを解釈します。
フォームのアクションパスに、?_method=PUT を加えれば、それは PUT リクエストとして解釈されます。
editアクションを作成
コントローラーに edit アクションを作成しましょう。
req.params.id からユーザーの ID 受け取り、findById()`メソッドでデータベースから特定のユーザーを捜索します。
ユーザーが見つからない場合には、エラーを送出します。
また res.locals オブジェクトに代入した値はビューで変数として使用できます。
edit: async (
    req: Express.Request,
    res: Express.Response,
    next: Express.NextFunction
  ) => {
    const userId: string = req.params.id
    try {
      const user = await User.findById(userId)
      res.locals.user = user
      next()
    } catch (err) {
      next(err)
    }
  },
  editView: (req: Express.Request, res: Express.Response) => {
    res.render('users/edit')
  },
updateアクション
update アクションも作成しましょう。
findByIdAdUpdate() メソッドを使用すれば、ユーザーを ID で見つけたあとに更新できます。
update: async (
    req: Express.Request,
    res: Express.Response,
    next: Express.NextFunction
  ) => {
    const userId: string = req.params.id
    const userParams = req.body as UserDoc

    try {
      await User.findByIdAndUpdate(userId, {
        $set: userParams,
      })
      res.locals.redirect = '/users'
      next()
    } catch (err) {
      next(err)
    }
  },
ルーティングに、edit と update を追加しましょう。 update アクションは PUT リクエストを受け取ります。
router.get('/:id/edit', usersController.edit, usersController.editView)
router.put('/:id/update', usersController.update, usersController.redirectView)
ユーザーを削除する
最後に、delet アクションを作成しましょう。 ユーザーを削除するために、ビューは作成しません。 インデックスページに削除のために動線を用意します。
<td>
  <a
    href="<%= `users/${user._id}/delete?_method=DELETE` %>"
    onclick="return confirm('本当にこのユーザーを削除しますか?')"
  >
    DELETE
  </a>
</td>
deleteアクション
ユーザーを削除するための delete アクションをコントローラーに追加します。
特定のユーザーを削除するために findByIdAndRemove を呼び出します。
delete: async (
    req: Express.Request,
    res: Express.Response,
    next: Express.NextFunction
  ) => {
    const userId: string = req.params.id

    try {
      await User.findByIdAndRemove(userId)
      res.locals.redirect = '/users/'
      next()
    } catch (err) {
      next(err)
    }
  },
今までの流れと同じく、ユーザーの削除に成功したら次のミドルウェア関数を呼び出し、失敗したらエラーを渡します。
最後に、ルーティングに追加しましょう。
router.delete('/:id/delete', usersController.delete, usersController.redirectView)これで、基本的な CRUD 操作は完了です。